Using Excel daily means having a countless number of workbooks 一 whether it’s for separate departments, projects, dates, and so on.
But, to create that one Master Workbook storing everything, you may find the need to merge multiple Excel Files into one.
I know, this could seem like an eternal job at first, especially when you think of copy-pasting the entire thing.
However, you could do this within a minute using Power Query and VBA tool. So, even if you have 6000 files to combine, it’s a cakewalk!
Transfer Sheets
If you have fewer sheets and files to combine, just move the worksheets from one workbook to another.
It’s definitely a better option than the manual copy-paste method as you do not have to worry about skipping formulas, formats, matching sheets area, etc.
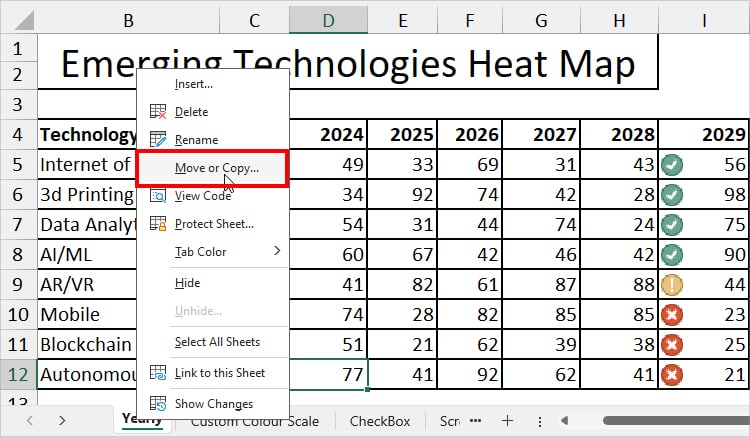
Suppose, I want to merge 3 workbooks into 1 file. I’ll transfer the sheets from 2 workbooks to one.
- Firstly, open all workbooks.
- Head to one of the Workbooks. Right-click on the Sheet and choose Move or Copy.
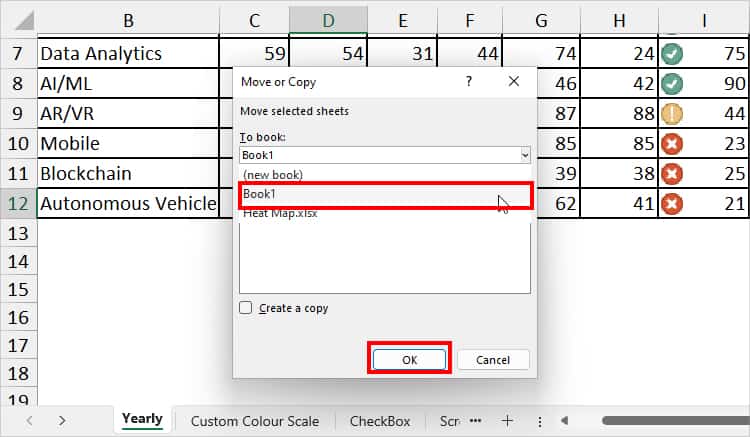
- On Move or Copy dialogue box, pick File Name and hit OK.
- Repeat the steps for all other sheets.
Using Power Query
Sometimes you may have a large number of files to merge in Excel. For Instance, it could be 5000 files or more. In that case, it isn’t possible to combine files using the above method.
Instead, get your hands on Excel’s best tool to append data named “Power Query.” Regardless of the file size or numbers, you can easily merge them into one with a few steps.
I personally like the fact that the Power Query tool allows you to shape your data before you load them. So, it doesn’t matter if the files have different row and column lengths.
Also, you could combine any file format like .txt, .pdf, .json, .xml, etc.
Import File
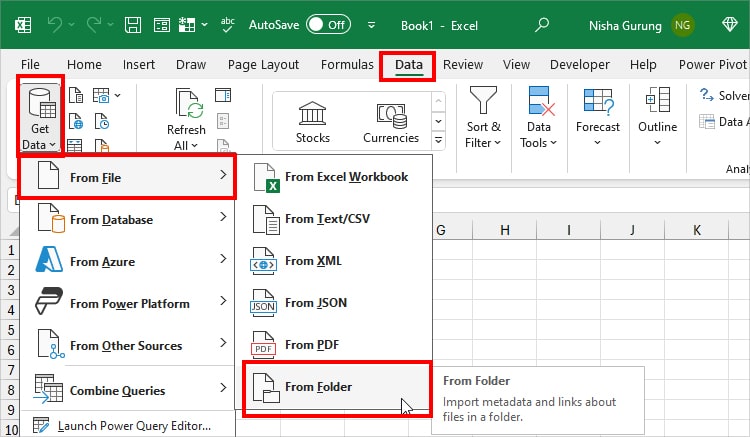
Before you start, make sure you have all files inside one Folder.
Launch Excel and open New Workbook. From the Data tab, choose Get Data > From File > From Folder.
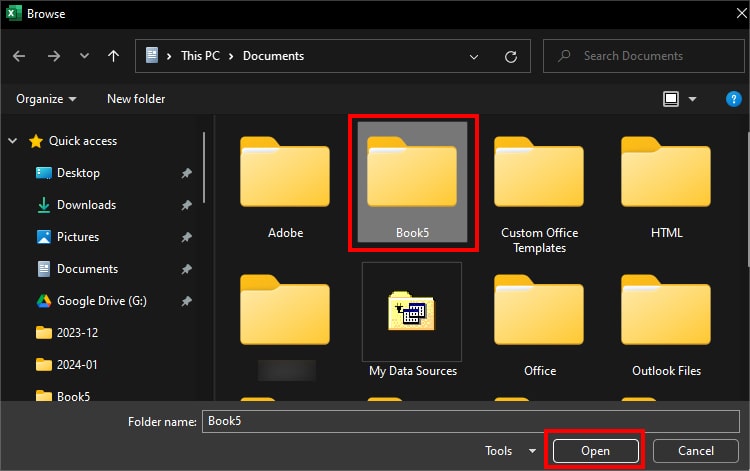
On Browse, locate and pick a Folder. Hit Open.
If you don’t need to change data, click Combine > Combine and Load. You’ll have the merged files in the current sheet.
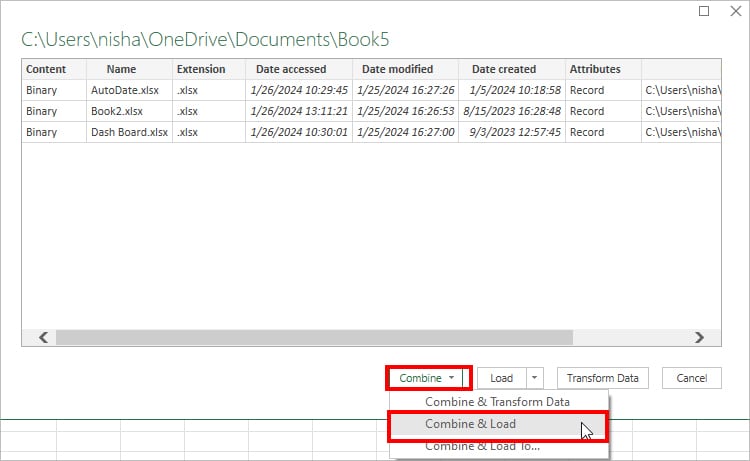
But, let’s say your data format does not align with all workbooks. In that case, expand Combine > Combine & Transform Data to edit the merged files.
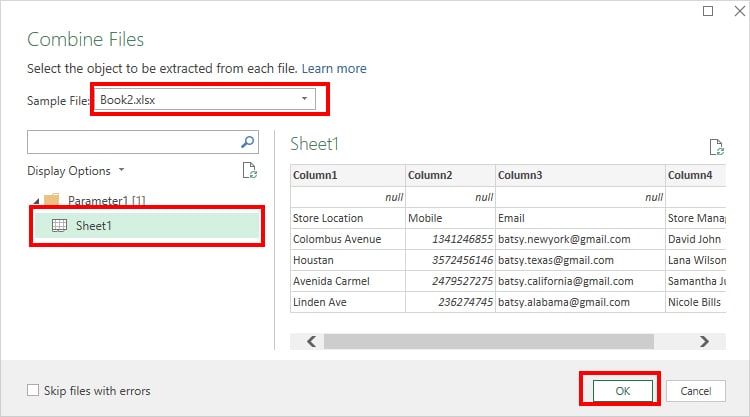
On Combine Files, choose Workbook in Sample File and select a Sheet. Redo step 5 for all files and click OK.
Transform Data
If you chose Combine & Transform Data, here’s how you change your dirty sheet into a clean and organized one.
It’s solely up to you to perform these steps in the sample source file or the appended version in the Queries. For Instance, here, Book5 is my merged file.
On the Power Query window, click the Filter button and refine information as required.
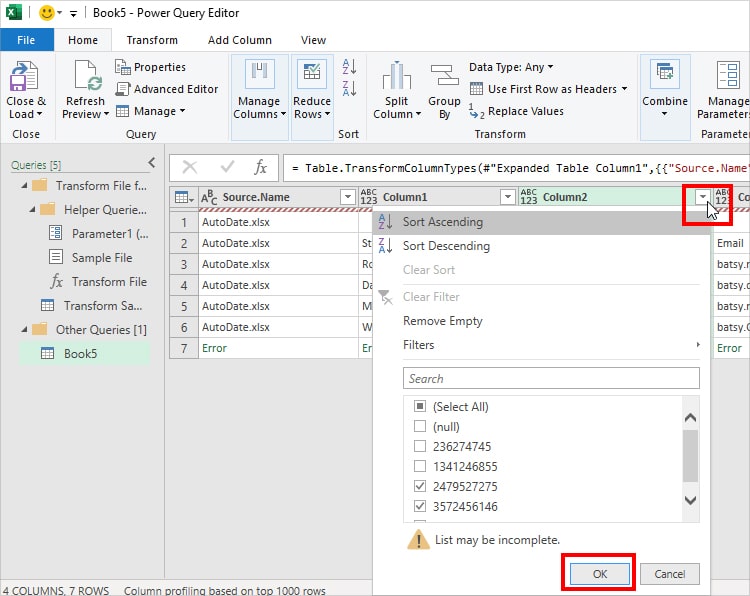
To shape your data, explore each of these tabs in the Power Query.
- Home Tab: Manage and Split Columns, Reduce Rows, Sort Data, Replace Values, Add Extra Data Source, etc.

- Transform Tab: Reverse Rows, Count Rows, Pivot Column, Format Texts, Extract data, Calculate Statistics, Round Numbers, and so on.

- Add Column: Edit Column like apply Custom format, count, duplicate, etc. Calculate Conditional Sum.

- View: Count Unique and Distinct items, Advanced Editor.

After you’re done editing the data, go to Home and select Close & Load.
Using VBA
If you’re familiar with Excel’s Macro, you might know that it’s one of the smartest and quickest ways to do your work in Excel.
Trust me! From my experience, combining files with the VBA code can be work-saving and productive. Once you have the Macro stored in your workbook, run it as many times as required.
Here, I have constructed the VBA code that’ll prompt you to choose Files stored on your PC. When you hit Open, the code will merge every selected file and load them in each separate sheet.
Unlike above, you do not have to have all the files in a single folder in this method.
But, since we’re using the Developer tab here, make sure you have that Tab on your Excel Sheet.
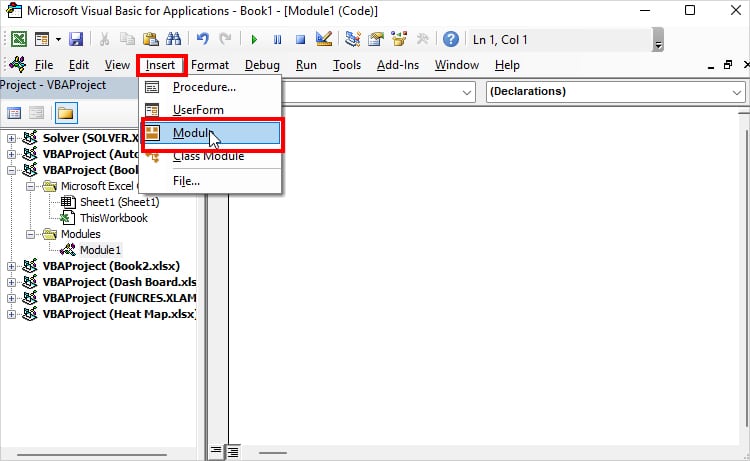
- Open a New Workbook.
- Use the
Alt + F11shortcut for Visual Basic. - From the menu, expand Insert > Module.
- Now, copy-paste.

Option Explicit
Sub CombineMultipleExcelFiles()
Dim FileExtName, CurFileName As Variant
Dim countWb, countWS As Integer
Dim CurWs As Worksheet
Dim CurWB, WB As Workbook
FileExtName = Application.GetOpenFilename(FileFilter:="Microsoft Excel Workbooks (*.xlsm;*.xls;*.xlsx),*.xlsm;*.xls;*.xlsx", Title:="Please Select Excel Files", MultiSelect:=True)
If (vbBoolean <> VarType(FileExtName)) Then
If (UBound(FileExtName) > 0) Then
countWb = 0
countWS = 0
Application.ScreenUpdating = False
Application.Calculation = xlCalculationManual
Set CurWB = ActiveWorkbook
For Each CurFileName In FileExtName
countWb = countWb + 1
Set WB = Workbooks.Open(Filename:=CurFileName)
For Each CurWs In WB.Sheets
countWS = countWS + 1
CurWs.Copy after:=CurWB.Sheets(CurWB.Sheets.Count)
Next
WB.Close SaveChanges:=False
Next
Application.ScreenUpdating = True
Application.Calculation = xlCalculationAutomatic
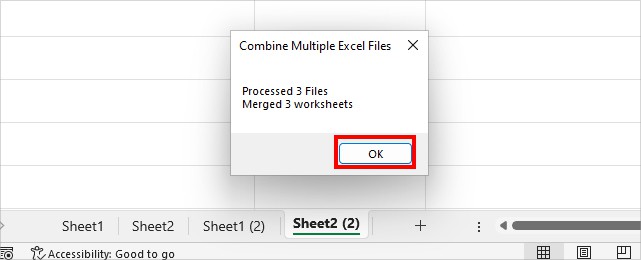
MsgBox "Processed " & countWb & " Files" & vbCrLf & "Merged " & countWS & " worksheets", Title:="Combine Multiple Excel Files"
End If
Else
MsgBox "No Files Selected", Title:="Combine Multiple Excel Files"
End If
End Sub
- Hit Run.

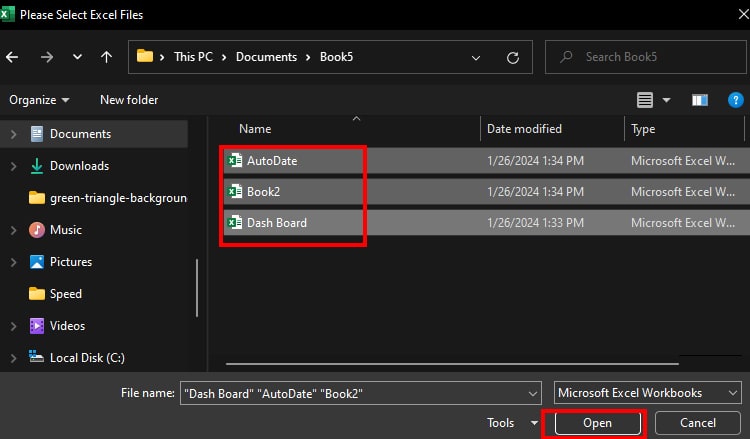
- On Please Select Excel Files window, choose Multiple Files using the Ctrl key. Click Open.
- You’ll have the combined file in the current workbook. Click OK.
- Save the File and Turn on the AutoSave feature.