Say, you’re working on a very long important spreadsheet when it starts to run slow. You start troubleshooting and figure out it’s because your file size has ended up being too large.
If you’re wondering, “Why is My Excel File so Large?”, it’s probably because your spreadsheet contains too many elements. While Excel offers a number of tools for visualization like Charts, Power Query, and PivotTables, these elements quickly expand the file size.
In this article, we will explore what makes your Excel files bloat, and how you can limit it to some extent.
Why is My Excel File so Large?
Apart from visualization tools, your file may even expand if you have a sea of data that seemingly never ends. Here are some of the other elements that could have drastically increased the size of your spreadsheet:
- Conditional Formatting
- Formulas
- Formatting
- Excess Named Ranges
- Charts
- Images
- Macros
- PivotTable Cache
- Embedding Objects within the Sheet
- External Links
Remember that using these elements will only increase your file size if you’ve inserted them excessively.
How to Check Sizes for Individual Sheets?
Before you head into the fixes, consider checking the size each spreadsheet takes up for the entire workbook. Sometimes, there are only one or two worksheets causing size issues, so identifying them beforehand will speed up the process of decreasing the file size.
We have a macro that checks and returns the size of each spreadsheet in the active workbook. Make sure you’ve enabled the developer tab and follow these steps to create a macro in Excel:
- Go to the Developer tab.
- Select Visual Basic from the Code section.
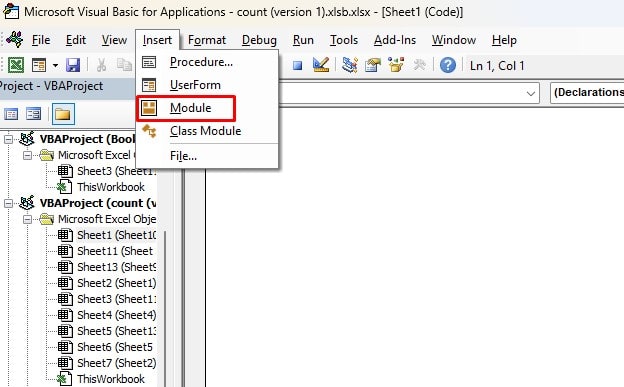
- From the menu bar, select Insert > Module.
- Enter the following code:
Sub GetEachWorksheetSize()
Dim strTargetSheetName As String
Dim strTempWorkbook As String
Dim objTargetWorksheet As Worksheet
Dim objWorksheet As Worksheet
Dim objRange As Range
Dim i As Long
Dim nLastEmptyRow As Integer
strTargetSheetName = "Sheet Sizes in Bit"
strTempWorkbook = ThisWorkbook.Path & "\Temp Workbook.xls"
With ActiveWorkbook.Worksheets.Add(Before:=Application.Worksheets(1))
.Name = strTargetSheetName
.Cells(1, 1) = "Sheet"
.Cells(1, 1).Font.Size = 14
.Cells(1, 1).Font.Bold = True
.Cells(1, 2) = "Size (approx)"
.Cells(1, 2).Font.Size = 14
.Cells(1, 2).Font.Bold = True
End With
Set objTargetWorksheet = Application.Worksheets(strTargetSheetName)
For Each objWorksheet In Application.ActiveWorkbook.Worksheets
If objWorksheet.Name <> strTargetSheetName Then
objWorksheet.Copy
Application.ActiveWorkbook.SaveAs strTempWorkbook
Application.ActiveWorkbook.Close SaveChanges:=False
nLastEmptyRow = objTargetWorksheet.Range("A" & objTargetWorksheet.Rows.Count).End(xlUp).Row + 1
With objTargetWorksheet
.Cells(nLastEmptyRow, 1) = objWorksheet.Name
.Cells(nLastEmptyRow, 2) = FileLen(strTempWorkbook)
End With
Kill strTempWorkbook
End If
Next
End Sub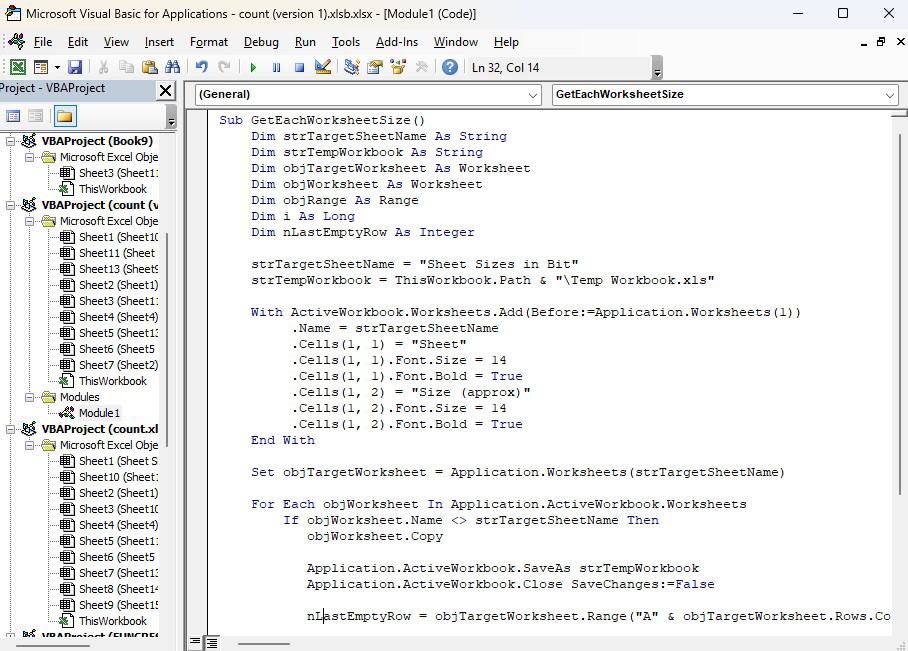
- Hit F5 on your keyboard.
- Wait for the macro to finish.
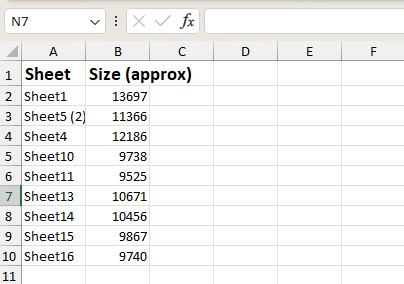
After the Macros are done running, you will see a new worksheet named “Sheet Sizes in Bit”. You can check the sizes of the corresponding sheet names in column B. The calculated sheet sizes will be in bits.
How to Shrink an Excel File?
Back to the main bit, how to reduce the size of large Excel files? The size of your files in Excel is dependent on the elements we listed, prior in this article. Depending on what you think may be causing this file issue, refer to the following fixes:
Manage Conditional Formatting Rules
Conditional Formatting is a complex Excel feature. Whenever you refresh your worksheet, Excel has to check if any of the referenced cells meet the set rule. If you’ve set a conditional formatting rule on a now, static range, you can remove the rule and instead shade the cell with a background color.
- Go to the Home tab.
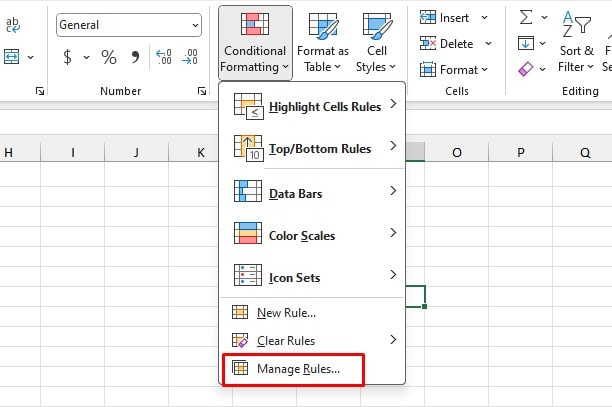
- Select Conditional Formatting > Manage Rules.
- Next to Show formatting rules for, choose This worksheet.
- Scroll through the conditional formatting rules. If you locate one you can replace with cell shading, select it.
- Click on Delete Rule.
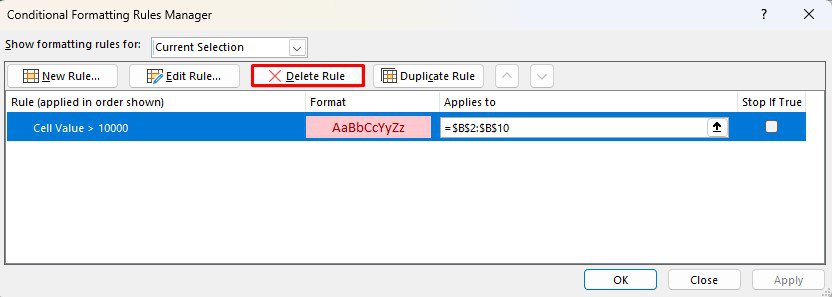
- Repeat steps 4 and 5 for all unwanted rules.
- Close the Conditional Formatting Rules Manager.
Convert Formulas to Static Values
If your worksheet has a lot of formulas, they may be increasing the size of your worksheet. If you no longer have values to add to your sheet, you can convert the formula into static values to save space.
- Select the cell containing your formula and copy it (Ctrl+C).
- Right-click on the same cell.
- Click V on your keyboard.
Avoid Nesting Too Many Functions
As I’ve mentioned before, using functions tends to take up a good chunk of space in your spreadsheet. So, if you can avoid nesting multiple functions in a formula, you can save some of that space.
For example, you can use the COUNTIFS function instead of nesting the COUNT and IF function and use either VLOOKUP, HLOOKUP, or XLOOKUP instead of nesting INDEX and MATCH.
Remove Excess Formatting
While you may save space by opting for manual formatting over conditional formatting, over-using them will also contribute to increasing your sheet size.
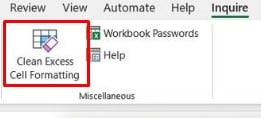
If you’re an Excel 365 user and have Excel 365 for enterprises or Office Professional Plus, you can use the Inquire add-in to remove such formatting from your sheet. Otherwise, you’ll have to manually remove the formatting from Home > Clear > Clear Formats.
- Go to File > Options.
- From the sidebar, click Add-ins.
- Next to Manage, select COM Add-ins > Go.
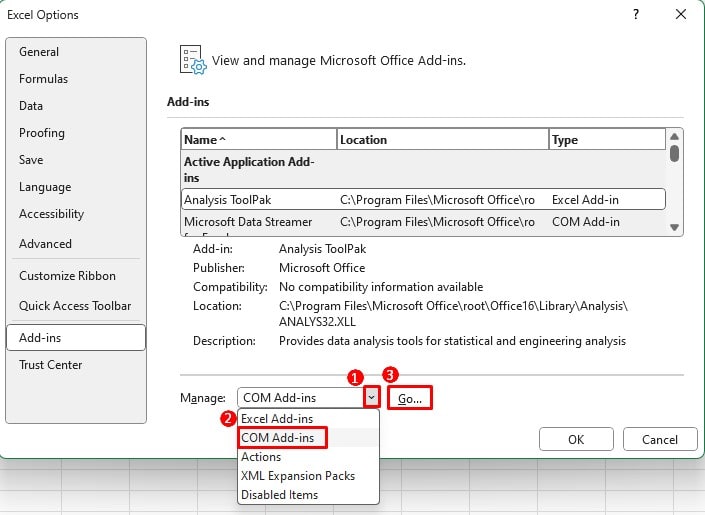
- Select Inquire > OK.
- Switch to the Inquire tab.
- Select Clean Excess Cell Formatting from the Miscellaneous section.
Store File in .xslb Format
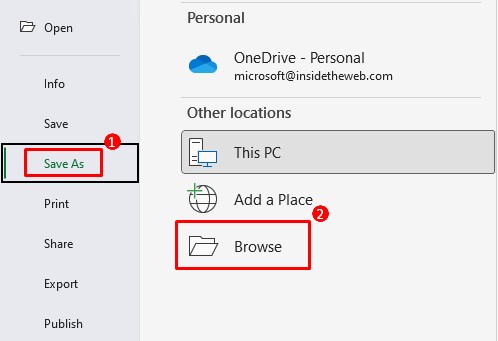
You can also save your document as a binary workbook, in the .xslb format. This will compress your workbook and significantly reduce the size of your file.
- Go to File > Save As.
- Click on Browse and head to the location you wish to save your file in.
- Name your file next to File name.
- Select the fly-out next to Save as type.
- Choose Excel Binary Workbook (.xlsb).
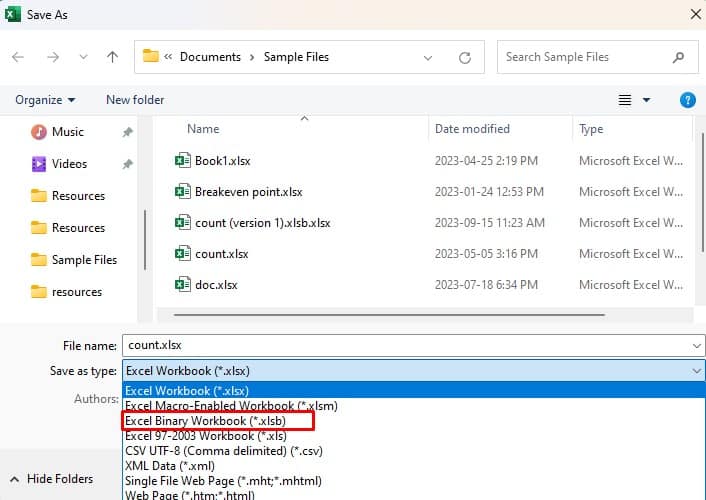
- Click Save.
Adjust Image Resolution and Compression
You may have heard the saying, “One picture is worth a thousand words”. While this is true, one high-resolution image is also worth a lot of MB!
If the image is there for purely decorative purposes, consider removing it. However, if you really want to keep it, you can lower the image resolution or compress it to reduce the size it takes up on your spreadsheet.
Adjust Resolution
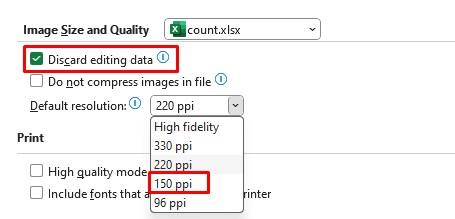
- Head to File > Options.
- Select Advanced from the sidebar.
- Scroll down to the Image Size and Quality section.
- Enable Discard Editing Data and disable Do not compress images in file.
- Set the Default resolution to 150 ppi or lower.
Compress Image
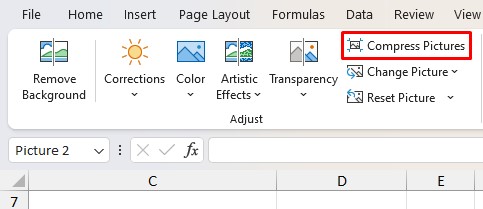
- Select the image then head to Picture Format.
- From the Adjust section, click Compress Pictures.
- Under Compression options, uncheck Apply only to this picture so that the following configuration is applied to all pictures.
- Enable Delete cropped areas of pictures. This will remove the cropped bits of your image.
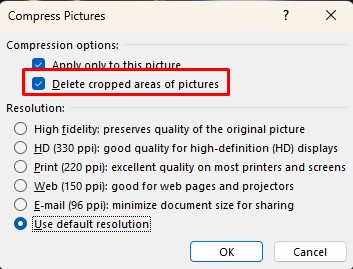
- Set a lower Resolution.
- Click OK.
Remove Unused Macro
If you’re an avid macro user, you may have stored up a lot of macros in your workbook. If there is a macro you used for a one-time task (like the one we have in this article!), it is best you remove it to clear up some room.
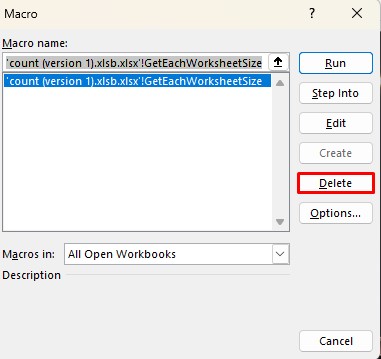
- Go to the Developer tab.
- Click Macros from the Code section.
- Select the macro you wish to delete from the window.
- Click Delete.
Remove PivotTable Cache
PivotTables are great for summarizing a long data set. However, when you create a PivotTable, you end up collecting redundant data from the source of the PivotTable, called PivotTable Cache. You can clear the cache to free up some file storage.
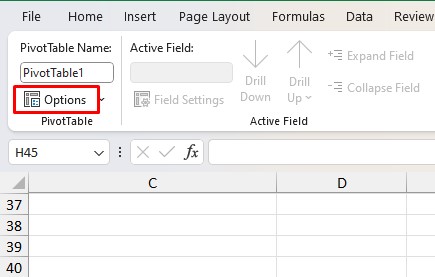
- Select a cell from your PivotTable.
- Go to the PivotTable Analyze tab.
- From the PivotTable section, click on Options.
- Switch to the Data tab.
- Uncheck Save Source data with file.
- Enable Refresh Data when opening the file.
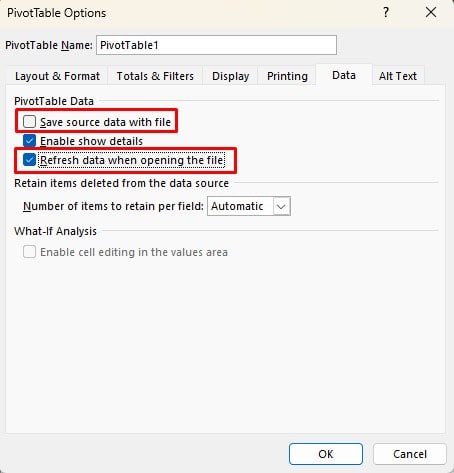
- Click OK.
Clear Excessive Embedding
In Excel, you can embed external content such as a PDF inside your worksheet. These embeds update automatically as you make changes in the source file.
If these embeddings aren’t crucial, try limiting their use within your sheet as they can make your file size pretty large. You can clear embedding by simply clicking on it and pressing the Delete key on your keyboard.
Break Links
Linking is a great way to cite your information. However, if you do it in excess, they will take up space. Therefore, if you have hyperlinks or internal links that aren’t as useful in the document, consider breaking them to save up some space.
- Go to Data.
- From the Queries & Connection section, select Edit Links.
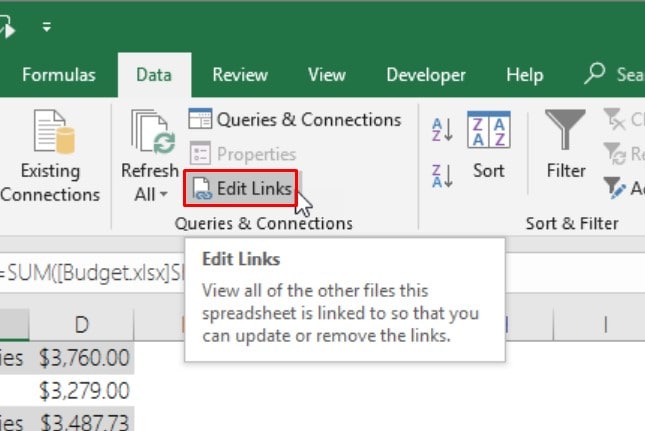
- Hold the Ctrl key and select the links you wish to break.
- Click Break Link.