Whenever you need to prepare a schedule or keep track of projects, the first thing you would want on your spreadsheet is the calendar. Be it to calculate the working hours, create project progress, prepare a Gantt Chart, etc.
Although there’s no built-in Calendar tool in Excel, you could use Template, Formula, or run a macro named “Calendar Maker” to create one from scratch. In addition to it, there are also Office Add-Ins if you wish to directly insert calendars.
Here, we have focused more on adding a dynamic Calendar quickly.
Using Excel Templates
Excel has a number of readily available Calendar templates that you can download and customize as you wish.
For Example, the School Year Calendar, Seasonal Calendar, 12-month calendar, Calendars for Budget Trackers, To-do lists, Daily schedule trackers, and many more.
Depending on your need, choose any one Calendar design and edit them. These templates are the best option when you do not want to create a Calendar from scratch.
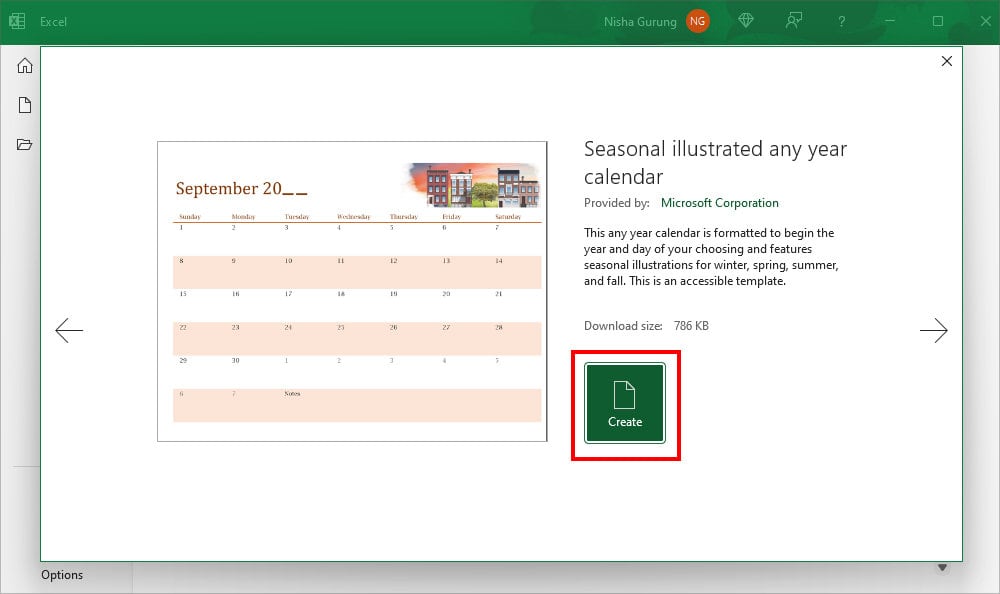
Here, for demonstration purposes, I will create the Seasonal Illustrated Any Year Calendar template and edit it. This template has a 12-month calendar in a separate sheet.
Add Calendar
- Launch Excel and head to New.
- On the Search Bar, enter Calendar.
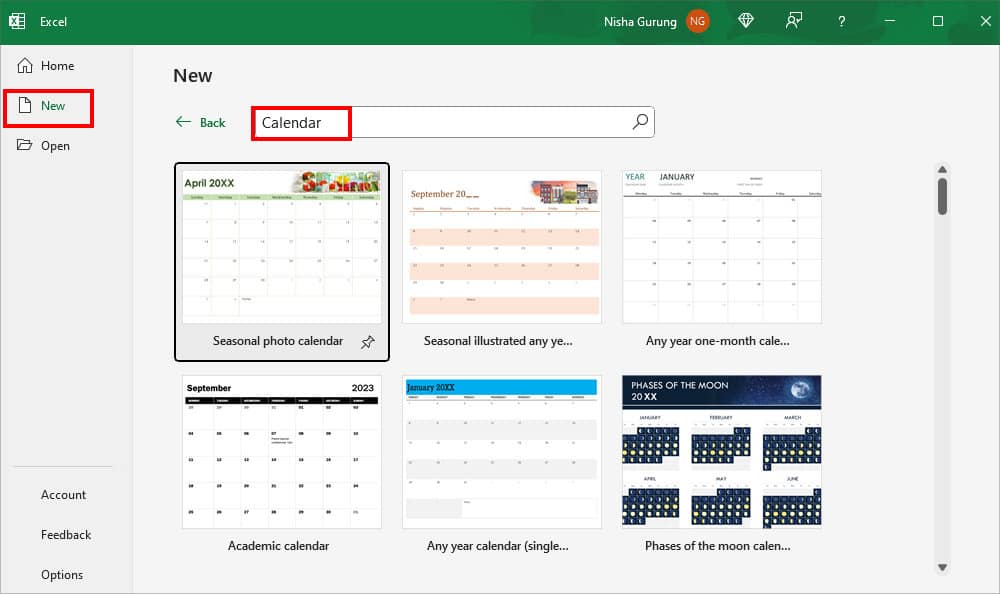
- Choose any one Calendar Templates and open it. Click on Create.
- If prompted, click Enable Editing.
Customize Calendar
Now, when you click on each date in the Calendar, you can see that the cells contain the formula.
It is a dynamic calendar. Meaning, that if you change the year from 2023 to 2025, you’ll automatically have the months, weeks, and dates updated as per that year 2025. Isn’t this amazing?
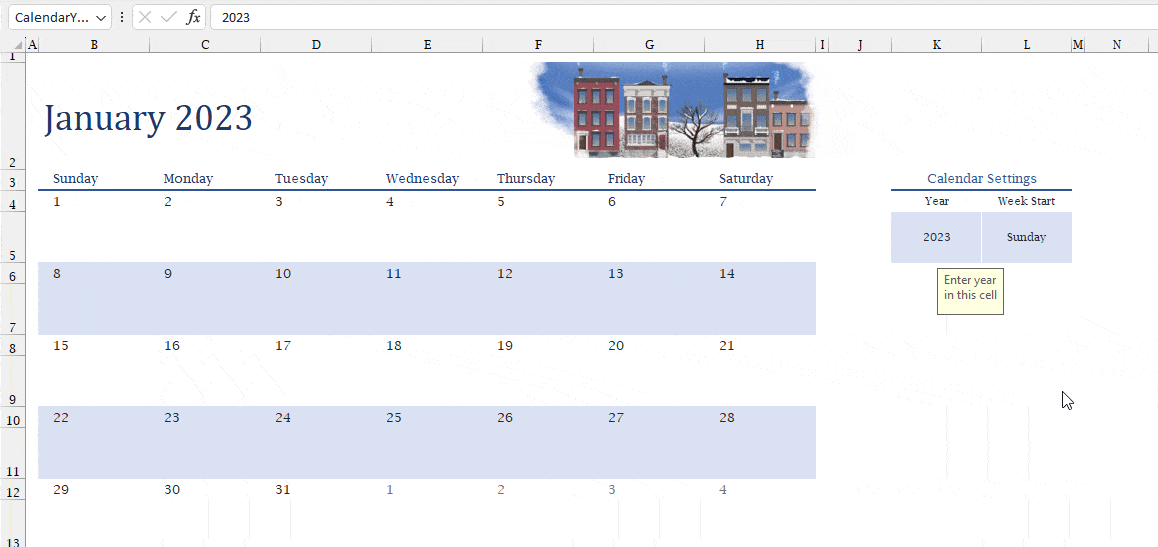
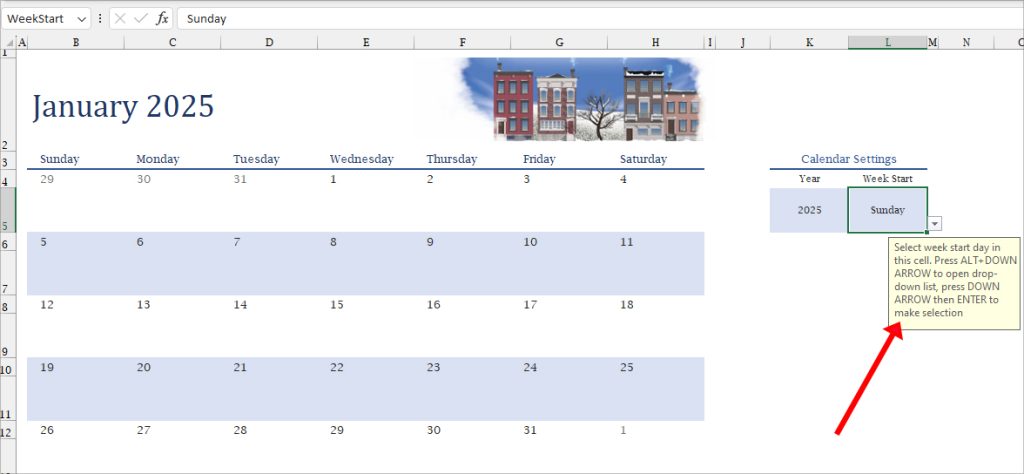
To customize your calendar template and make it more personalized, follow the instructions as mentioned in the Cell Note.
For Instance, expand-drop-down and change the Week Start day.
You can also add Events, Holidays, and so on. To mark a Holiday on the calendar, I suggest you use Conditional Formatting to highlight the date.
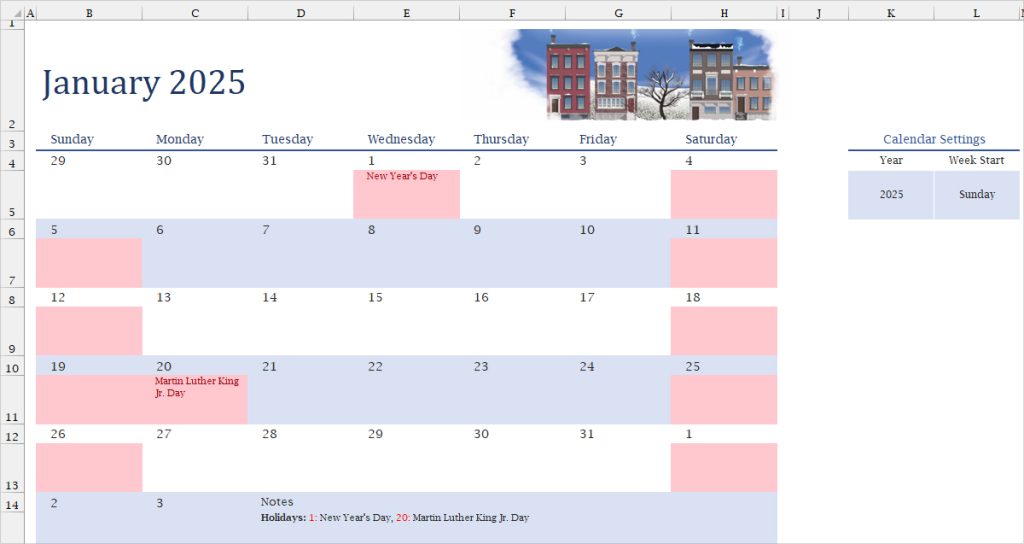
Once you’re done, Save your workbook. Later, you can move or copy those Calendar sheets to your existing workbook.
Using Formula
Next, you can also insert a calendar by using the Formula. This method is especially for users who do not want to have an entire 12-month calendar in their spreadsheet.
Instead of manually creating each element of calendars like Day, Date, and Year individually, we will use an array formula that returns the entire Calendar Layout.
Here, I have mentioned the formula to return the calendar of the current month and Specific Month. Simply copy-paste the code onto your spreadsheet.
Formula 1: Current Month
=LET(refdate, TODAY(),events, J4:J8, first_of_month, refdate-DAY(refdate)+1, day_of_first, WEEKDAY(first_of_month), first_Day,first_of_month-day_of_first+1, c_,"+1", block_start,first_Day-14, block,SEQUENCE(8,7,block_start), loc,MATCH(block,OFFSET(events,,0,,1),0), content,IF(ISNUMBER(loc),INDEX(OFFSET(events,,1,,1),loc),""), IF(block=block_start+3,TEXT(block_start+21,"Mmm YYYY"), IF(block_start+7<=block,IF(block<=block_start+13,TEXT(block,"Dddd"), IF(MONTH(block)=MONTH(refdate),TEXT(DAY(block),"#")&CHAR(10)&content,"")),"")))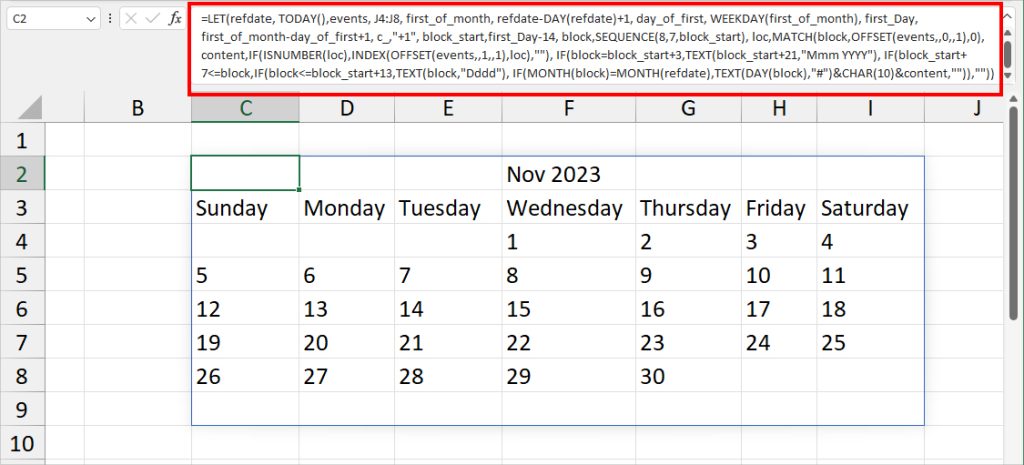
Formula 2: Specific Month
=LET(refdate, DATE(2023, 4, 11),events, J4:J8, first_of_month, refdate-DAY(refdate)+1, day_of_first, WEEKDAY(first_of_month), first_Day,first_of_month-day_of_first+1, c_,"+1", block_start,first_Day-14, block,SEQUENCE(8,7,block_start), loc,MATCH(block,OFFSET(events,,0,,1),0), content,IF(ISNUMBER(loc),INDEX(OFFSET(events,,1,,1),loc),""), IF(block=block_start+3,TEXT(block_start+21,"Mmm YYYY"), IF(block_start+7<=block,IF(block<=block_start+13,TEXT(block,"Dddd"), IF(MONTH(block)=MONTH(refdate),TEXT(DAY(block),"#")&CHAR(10)&content,"")),"")))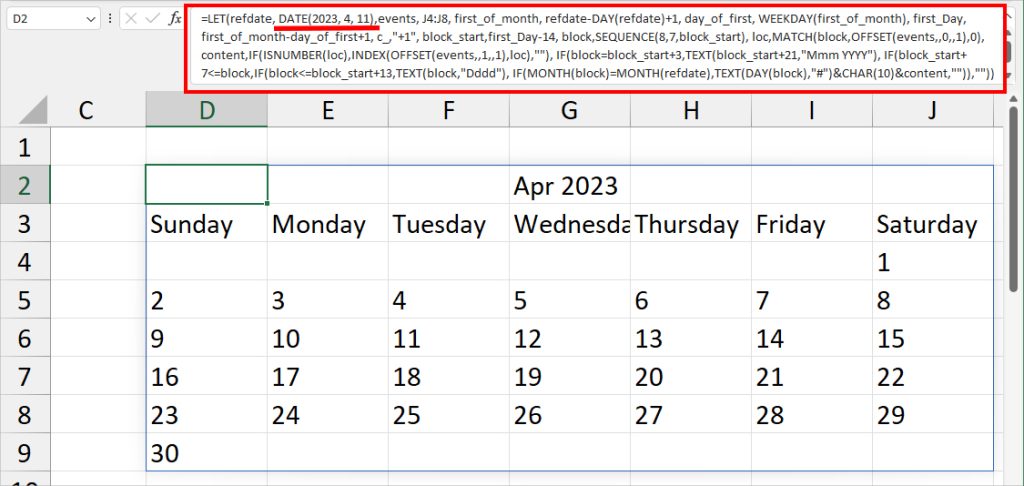
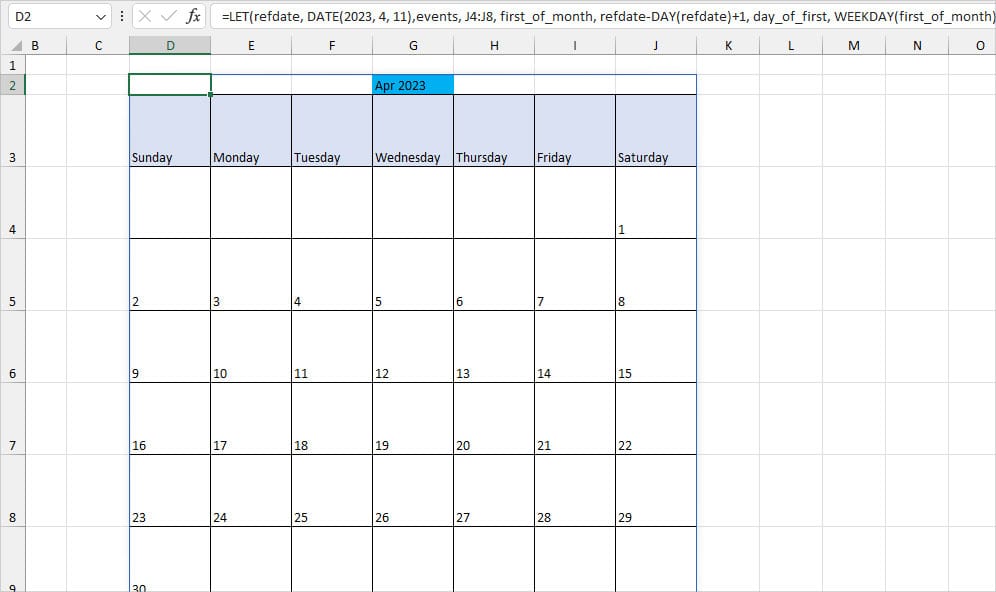
After you have the Calendar Layout, adjust the Cell size as required. For that, on your Home tab, head to the Cells section. Click Format > Row Height. Enter Row height and hit OK.
Again, for the Column Width, navigate to Format > Column Width. Type in the Column Width number and click OK.
After that, apply cell borders and highlight cells to make it stand out as a Calendar.
Using Add-In
In the above methods, we discussed all about creating a Calendar on your entire sheet. Now, let us learn how to add the mini calendar to your sheet.
Mini calendars are handy when you want to simply use them for date reference without cluttering your sheet.
For example, you could insert a Mini Calendar next to your workspace to prepare Project Schedules like Gantt Charts. This way, you wouldn’t have to keep going back and forth between spreadsheets or calendar apps to see the date.
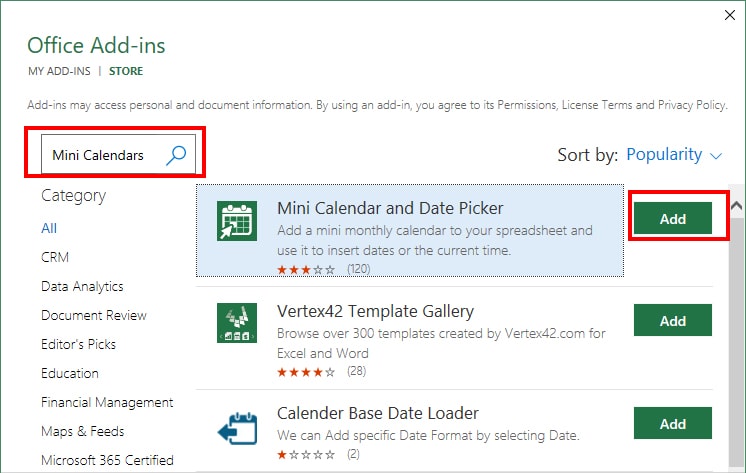
To do that, we will be using the Excel’s Add-In. Just for the example, I’ll add a Mini Calendar and Date Picker Add-In. You can choose any Calendar Add-In you like from the lists.
But, first, make sure you have the Developer tab in Excel Ribbon.
- On your workbook, navigate to the Developer Tab.
- From the Add-ins section, click on Add-ins.

- Then, on Office Add-ins, go to Store tab. Search Mini Calendars and hit the Add button.
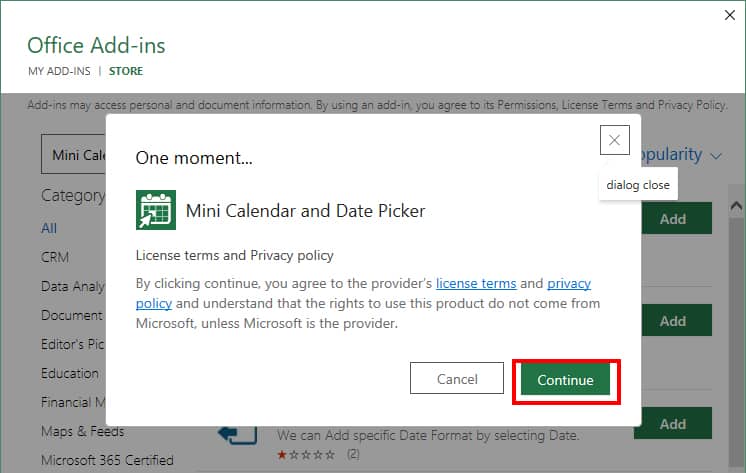
- Click Continue.
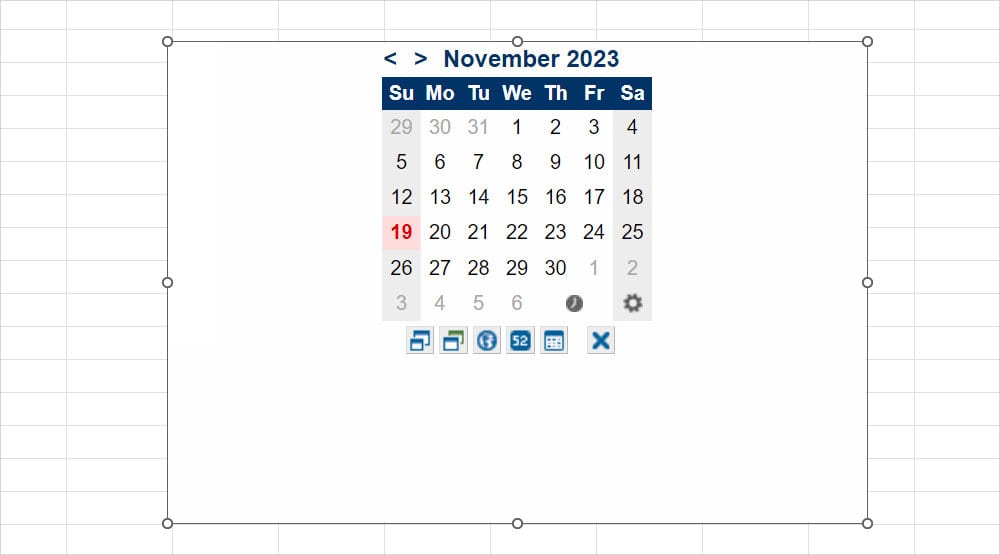
- You’ll have a Mini calendar on your Sheet. Click on the Left and Right Arrow buttons to change the month/year.
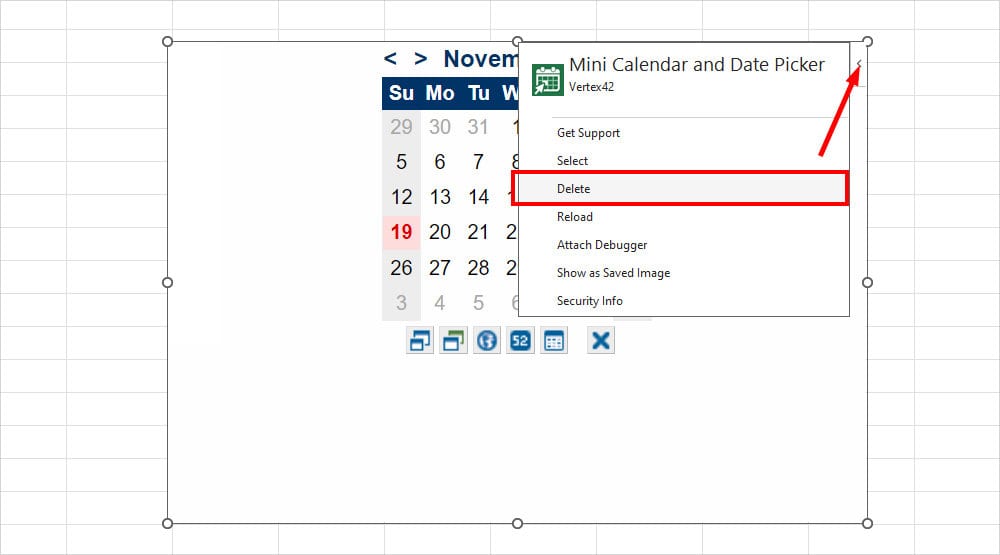
If you want to hide the calendar from the sheet, select Calendar and click the Expand menu. Then, click Delete.
Using VBA Code
In order to run the macro, if you haven’t already, enable the Developer tab. From the developer tab, you will then have to insert a module to enter the code for the CalendarMaker macro.
Step 1: Insert a Module in VBA Editor
For this step, we will use the Visual Basic Editor to enter the code for our macro.
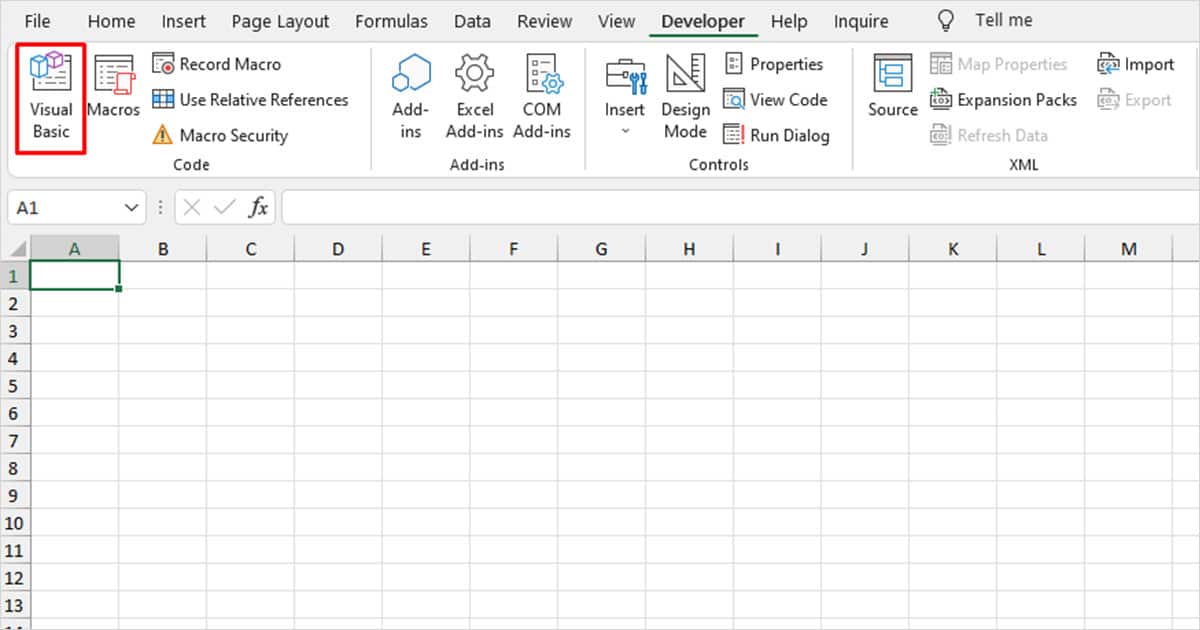
- Head to the Developer tab.
- From the Code section, select Visual Basic.
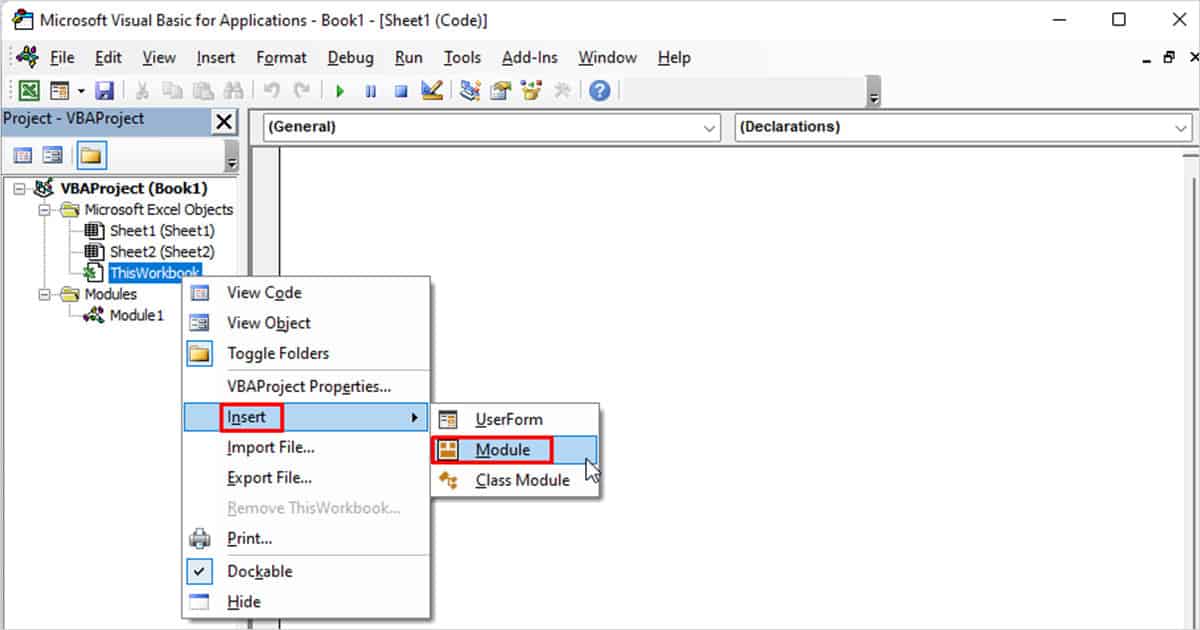
- Right-click on ThisWorkbook from the sidebar.
- Select Insert > Module.
Step 2: Enter the Code for the Macro
Once you insert the module, you can insert the code on the right. We will be using a simple Visual Basic procedure from the official Microsft website.
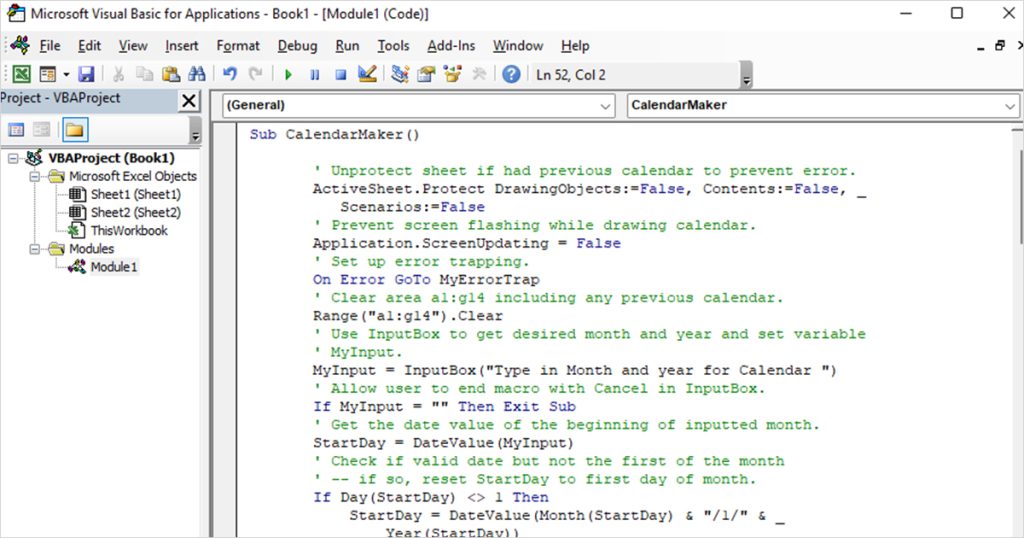
Copy-paste the following code into the window:
Sub CalendarMaker()
' Unprotect sheet if had previous calendar to prevent error.
ActiveSheet.Protect DrawingObjects:=False, Contents:=False, _
Scenarios:=False
' Prevent screen flashing while drawing calendar.
Application.ScreenUpdating = False
' Set up error trapping.
On Error GoTo MyErrorTrap
' Clear area a1:g14 including any previous calendar.
Range("a1:g14").Clear
' Use InputBox to get desired month and year and set variable
' MyInput.
MyInput = InputBox("Type in Month and year for Calendar ")
' Allow user to end macro with Cancel in InputBox.
If MyInput = "" Then Exit Sub
' Get the date value of the beginning of inputted month.
StartDay = DateValue(MyInput)
' Check if valid date but not the first of the month
' -- if so, reset StartDay to first day of month.
If Day(StartDay) <> 1 Then
StartDay = DateValue(Month(StartDay) & "/1/" & _
Year(StartDay))
End If
' Prepare cell for Month and Year as fully spelled out.
Range("a1").NumberFormat = "mmmm yyyy"
' Center the Month and Year label across a1:g1 with appropriate
' size, height and bolding.
With Range("a1:g1")
.HorizontalAlignment = xlCenterAcrossSelection
.VerticalAlignment = xlCenter
.Font.Size = 18
.Font.Bold = True
.RowHeight = 35
End With
' Prepare a2:g2 for day of week labels with centering, size,
' height and bolding.
With Range("a2:g2")
.ColumnWidth = 11
.VerticalAlignment = xlCenter
.HorizontalAlignment = xlCenter
.VerticalAlignment = xlCenter
.Orientation = xlHorizontal
.Font.Size = 12
.Font.Bold = True
.RowHeight = 20
End With
' Put days of week in a2:g2.
Range("a2") = "Sunday"
Range("b2") = "Monday"
Range("c2") = "Tuesday"
Range("d2") = "Wednesday"
Range("e2") = "Thursday"
Range("f2") = "Friday"
Range("g2") = "Saturday"
' Prepare a3:g7 for dates with left/top alignment, size, height
' and bolding.
With Range("a3:g8")
.HorizontalAlignment = xlRight
.VerticalAlignment = xlTop
.Font.Size = 18
.Font.Bold = True
.RowHeight = 21
End With
' Put inputted month and year fully spelling out into "a1".
Range("a1").Value = Application.Text(MyInput, "mmmm yyyy")
' Set variable and get which day of the week the month starts.
DayofWeek = WeekDay(StartDay)
' Set variables to identify the year and month as separate
' variables.
CurYear = Year(StartDay)
CurMonth = Month(StartDay)
' Set variable and calculate the first day of the next month.
FinalDay = DateSerial(CurYear, CurMonth + 1, 1)
' Place a "1" in cell position of the first day of the chosen
' month based on DayofWeek.
Select Case DayofWeek
Case 1
Range("a3").Value = 1
Case 2
Range("b3").Value = 1
Case 3
Range("c3").Value = 1
Case 4
Range("d3").Value = 1
Case 5
Range("e3").Value = 1
Case 6
Range("f3").Value = 1
Case 7
Range("g3").Value = 1
End Select
' Loop through range a3:g8 incrementing each cell after the "1"
' cell.
For Each cell In Range("a3:g8")
RowCell = cell.Row
ColCell = cell.Column
' Do if "1" is in first column.
If cell.Column = 1 And cell.Row = 3 Then
' Do if current cell is not in 1st column.
ElseIf cell.Column <> 1 Then
If cell.Offset(0, -1).Value >= 1 Then
cell.Value = cell.Offset(0, -1).Value + 1
' Stop when the last day of the month has been
' entered.
If cell.Value > (FinalDay - StartDay) Then
cell.Value = ""
' Exit loop when calendar has correct number of
' days shown.
Exit For
End If
End If
' Do only if current cell is not in Row 3 and is in Column 1.
ElseIf cell.Row > 3 And cell.Column = 1 Then
cell.Value = cell.Offset(-1, 6).Value + 1
' Stop when the last day of the month has been entered.
If cell.Value > (FinalDay - StartDay) Then
cell.Value = ""
' Exit loop when calendar has correct number of days
' shown.
Exit For
End If
End If
Next
' Create Entry cells, format them centered, wrap text, and border
' around days.
For x = 0 To 5
Range("A4").Offset(x * 2, 0).EntireRow.Insert
With Range("A4:G4").Offset(x * 2, 0)
.RowHeight = 65
.HorizontalAlignment = xlCenter
.VerticalAlignment = xlTop
.WrapText = True
.Font.Size = 10
.Font.Bold = False
' Unlock these cells to be able to enter text later after
' sheet is protected.
.Locked = False
End With
' Put border around the block of dates.
With Range("A3").Offset(x * 2, 0).Resize(2, _
7).Borders(xlLeft)
.Weight = xlThick
.ColorIndex = xlAutomatic
End With
With Range("A3").Offset(x * 2, 0).Resize(2, _
7).Borders(xlRight)
.Weight = xlThick
.ColorIndex = xlAutomatic
End With
Range("A3").Offset(x * 2, 0).Resize(2, 7).BorderAround _
Weight:=xlThick, ColorIndex:=xlAutomatic
Next
If Range("A13").Value = "" Then Range("A13").Offset(0, 0) _
.Resize(2, 8).EntireRow.Delete
' Turn off gridlines.
ActiveWindow.DisplayGridlines = False
' Protect sheet to prevent overwriting the dates.
ActiveSheet.Protect DrawingObjects:=True, Contents:=True, _
Scenarios:=True
' Resize window to show all of calendar (may have to be adjusted
' for video configuration).
ActiveWindow.WindowState = xlMaximized
ActiveWindow.ScrollRow = 1
' Allow screen to redraw with calendar showing.
Application.ScreenUpdating = True
' Prevent going to error trap unless error found by exiting Sub
' here.
Exit Sub
' Error causes msgbox to indicate the problem, provides new input box,
' and resumes at the line that caused the error.
MyErrorTrap:
MsgBox "You may not have entered your Month and Year correctly." _
& Chr(13) & "Spell the Month correctly" _
& " (or use 3 letter abbreviation)" _
& Chr(13) & "and 4 digits for the Year"
MyInput = InputBox("Type in Month and year for Calendar")
If MyInput = "" Then Exit Sub
Resume
End Sub
Step 3: Run the Macro in Your Worksheet
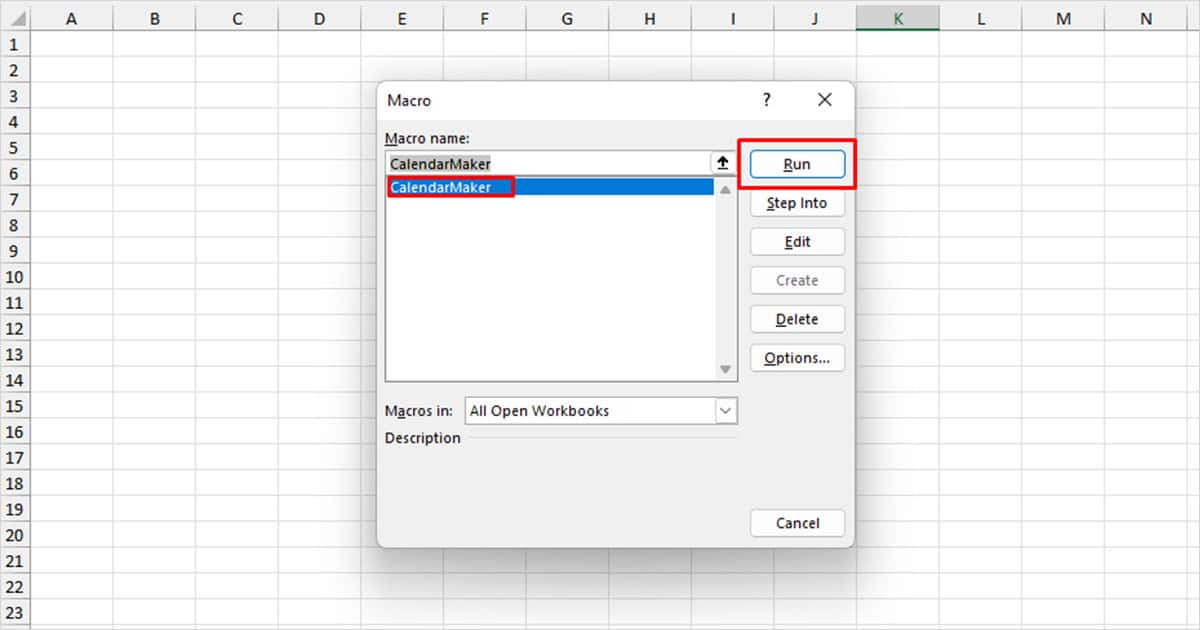
After you’ve entered the code, you can run the code as a macro. The macro will ask you to enter the name of the month and the year you wish to enter a calendar for.
- Go to the Developer tab and select Macro from the Code section.
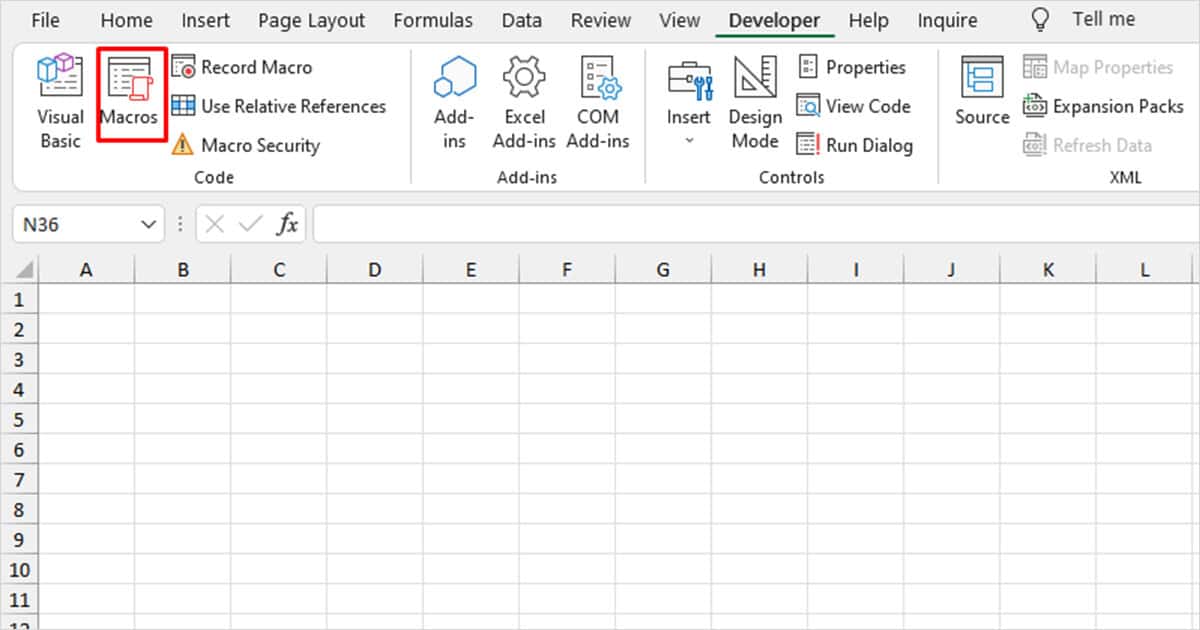
- Select CalendarMaker under the Macro name section.
- Click on the Run button.
- Type the name of the Month and the Year in the pop-up. For example, if you want to enter the calendar for January of the year 2023, I will enter “January 2023” in this section.
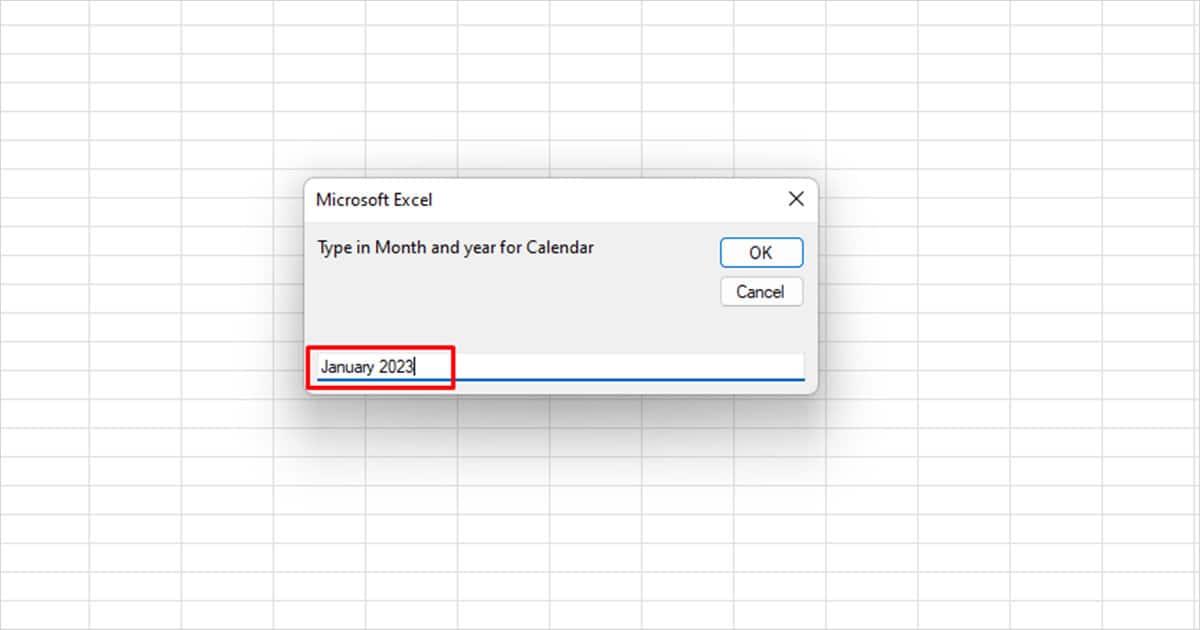
- Click OK.
After you insert the calendar, Excel automatically protects your sheet. This means you cannot make changes to your worksheet. To edit your document, unprotect your sheet from the Review tab in the menubar.