Often times we need to use specific values like Yes or No for different scenarios in Excel.
When dealing with a larger dataset, however, typing out such values for each entry may slow you down. So, we need a way to automate it.
One such way is to use the data validation method. Or, perhaps use a checkbox to select from pre-defined values.
Here are few ways you could add Yes or No values in Excel. Feel free to skip directly to the one that matches your situation.
Using Data Validation (Dropdown List)
Instead of manually inputting a Yes/No value, using a dropdown list is much more convenient. That’s because it already contains the required value; Yes/No in this case.
Once the dropdown is created, the user only has to choose the preferred option from the available options.
Step 1: Create a Dropdown List
- Select the cell (s) where you want to have the dropdown lists.
- Under the Data tab, click Data Validation. Or, use the shortcut key Alt + A + V + V.
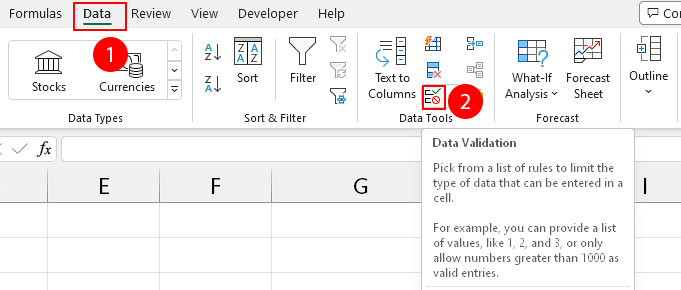
- Select the Settings tab.
- Now, choose the List option instead of the default Any value under the Allow section.
- Then, type Yes, No under the Source section.
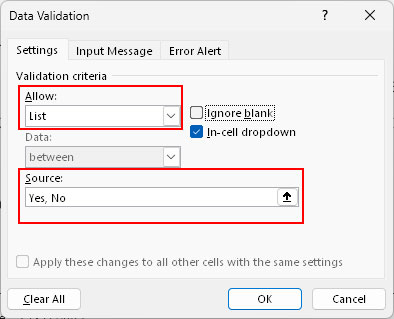
- Additionally, go to Error Alert and enable the Show error alert after invalid data is entered checkbox. Doing so will prevent the user from inputting values except for Yes/No.
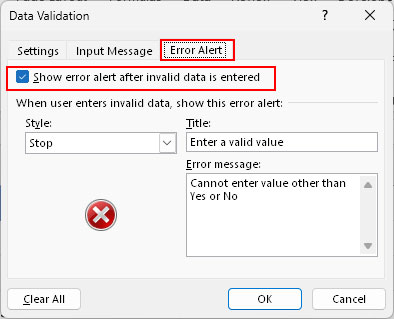
- Enter an error message to display if necessary.
- Click OK.
Step 2: Apply Color to the Dropdown List [Optional]
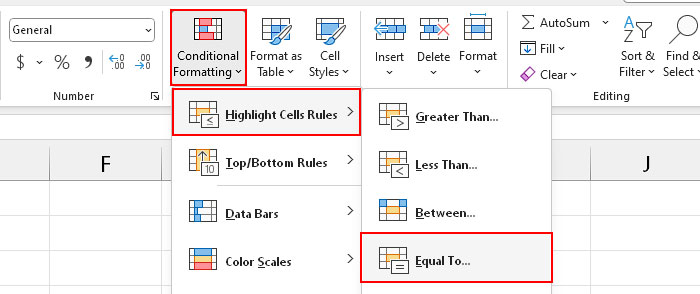
Once you create the dropdown list as mentioned above, you can use conditional formatting to apply colors based on which value is selected on the dropdown list.
For instance, Green color for Yes and Red color for No
- Select all the cells with such dropdown lists.
- Then, go to the Home tab and select Conditional Formatting > Highlight Cell Rules > Equal to.
- On the next prompt, type Yes on the left placeholder and choose Green fill with Dark green text option in the right placeholder.
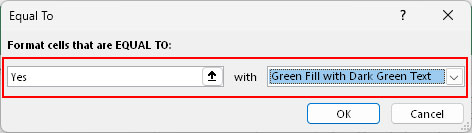
- Click OK.
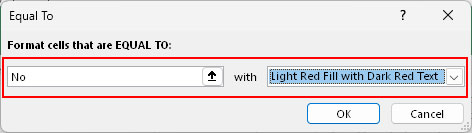
- Repeat step 2. But, this time, type No and choose the Light Red Fill with Dark Red Text option.
Using Form Control
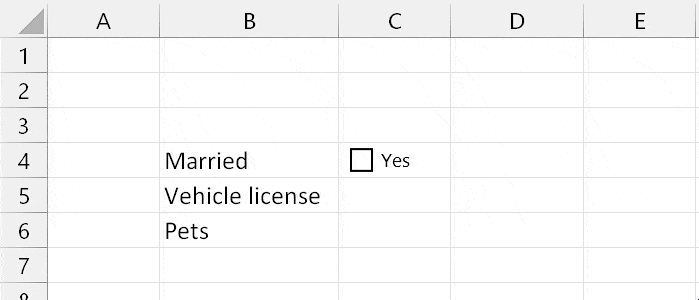
Here, we are adding a form control to insert a checkbox. A user can click on these checkboxes to choose between Yes and No.
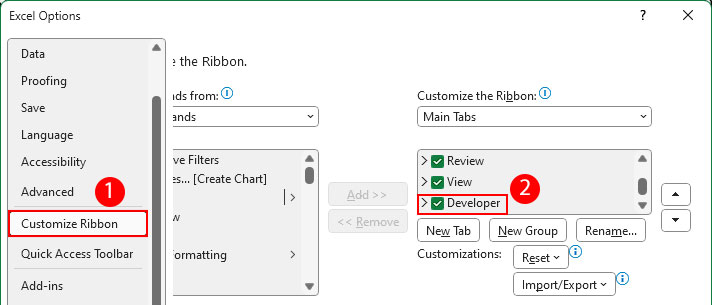
- Select the Developer tab. If you don’t have it, right-click on an empty area in the ribbon bar and select Customize the Ribbon. Then, enable the Developer checkbox under the Main tab section.
- Click Insert and select the Check Box option (looks like a little tick item in a square box).

- Once the cursor turns into a plus icon, drag it to add the checkbox inside a cell. Use one of the little circles in the borders to resize it.
- Right-click on the checkbox and select Edit Text. Then, delete any existing text and enter Yes or No.

- To add multiple checkboxes, select the cell with the checkbox and use the Fill handle to copy it across other cells.
Using VBA
If you have been inputting Y or N for convenience, you might need them to convert or replace them into corresponding Yes/No. For such cases, you can run a VBA code as mentioned below.
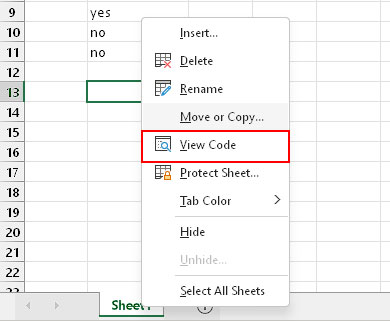
- Open the worksheet that contains such values (Y/N).
- Select the cells where you want to convert Y into “Yes” and N into “No”.
- Right-click on its tab and select View code. Or, just press Alt + F11.
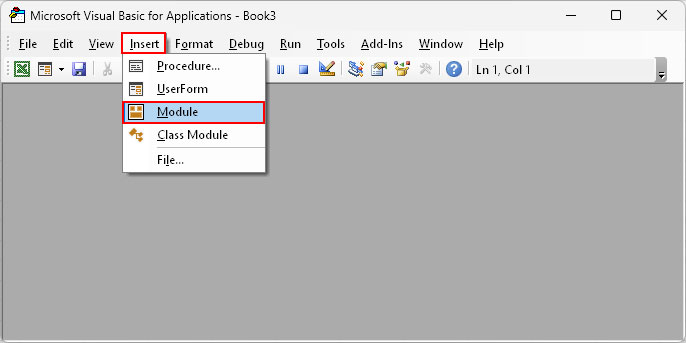
- On the VBA window, select Insert > Module from the menu bar.
- Copy and paste the following code into the VBA window.
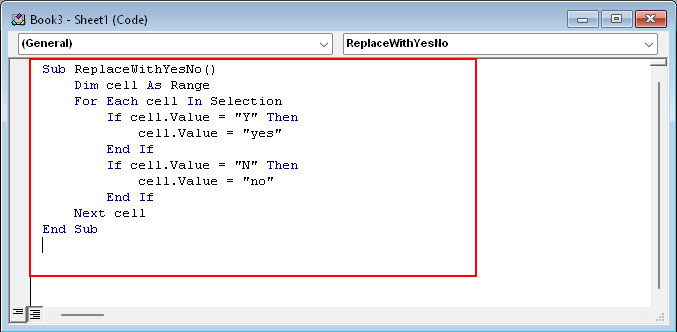
Sub ReplaceWithYesNo()
    Dim cell As Range
    For Each cell In Selection
        If cell.Value = "Y" Then
            cell.Value = "yes"
        End If
        If cell.Value = "N" Then
            cell.Value = "no"
        End If
    Next cell
End Sub
- Close the window.
- Then, press Alt + F8.
- Select the correct macro (ConvertYtoYesandNtoNo in this case) and click Run.
Using IF function
The IF function returns a value when a specific condition is met. So, you can use it to display a Yes or No value according to your desired condition.
Syntax:=IF(condition, <condition if true>, <condition if false>)
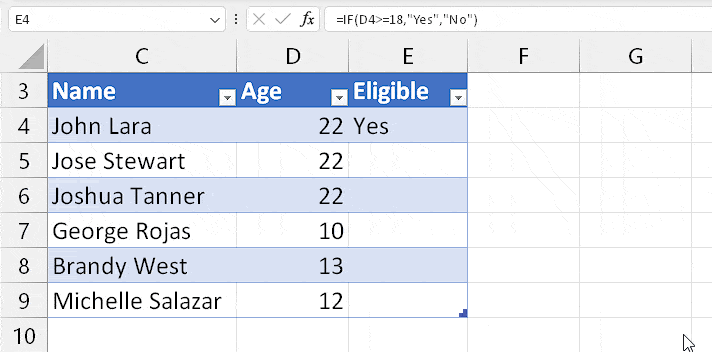
For instance,
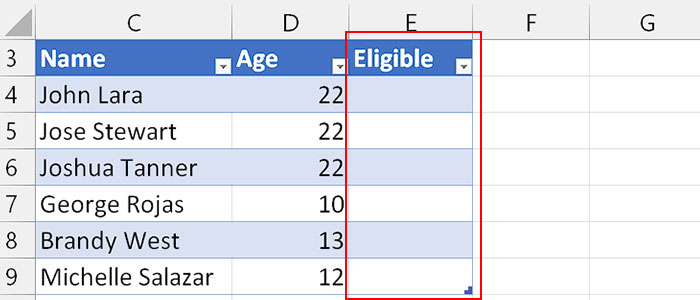
Here, we are trying to display a Yes/No value depending on whether the person is eligible for a driver’s license.
Given, that any person who is above 18 years old is eligible, we can write the formula as:
=IF(C3>18, Yes, No)
Now that we have used the IF condition on one cell, we can use the flash fill to check eligibility for other cells.