While working in Excel, you may come across a situation where you would want to calculate the number of months between two dates.
For instance, the number of months since the employee joined the company or calculating happy birthday.
There are mainly two ways you can months; using Excel’s built-in date function and creating a custom formula.
Using the DATEDIF Function
DATEDIF, also known as date difference, is a built-in Excel function that can calculate the difference between two dates in terms of months. The function works regardless of whether the dates are in different formats like a short date (2/8/2023) or a long date (Wednesday, February 8, 2023).
However, note that this particular formula doesn’t show up on the Excel autocomplete list while typing, so you have to type the formula.
Syntax:=DATEDIF(Start_Date,End_Date,"m")
The DATEDIF function takes three arguments as follows.
- Start_Date: takes the start date
- End_Date: takes the end date
- M: refers to the months and isn’t case sensitive, so you can use either “m” or “M”
To better understand the formula, let’s take a look at an example.
Here,
- Start _Date is
2/8/2023and its cell reference is A2. - End_Date is
3/8/2023and its cell reference is B2. - So, the formula becomes
=DATEDIF(A2,B2,”M”).
Special Case:
The DATEDIF function only counts a complete month.
For instance,

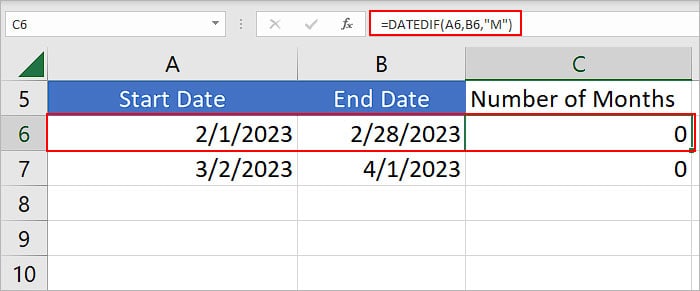
In the above image, although we have entered the start and end date of February month (2/1/2023 and 2/28/2023), the function still evaluates the total months as zero.
However, the second entry in Row 7 evaluates to 1 as February month is completed and March starts in it.
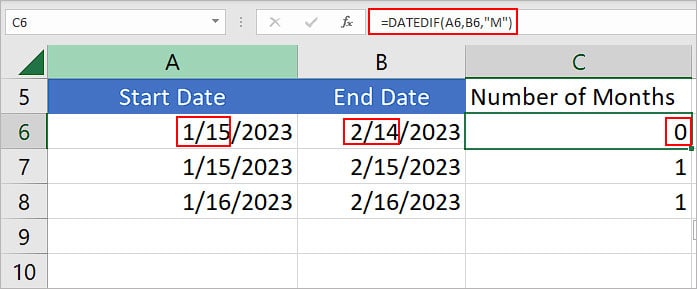
On the other hand, an interesting pattern you can see is that the above formula expects the month and day of the end date to be greater or equal to the start date. So, regardless of how many days (even 30) it has passed since the starting date, the formula won’t count them as a month.

Note: If the Start_date is later than the End_date, you will get a #NUM! Error. So, enter the dates into the formula appropriately. Also, don't enter a wrong date as it will return you #VALUE! error.By Creating a Custom Formula
Using Excel’s YEAR and MONTH function, you can create a custom formula to return the number of months between two dates. They extract the respective number of years and months from a given date.
Similar to the above function, it can also evaluate dates with both the short date and long date format.
Let’s take a look at an example.
Here, we used the following formula:=(YEAR(B2)-YEAR(A2))*12+MONTH(B2)-MONTH(A2)
Where,
- A2 and B2 cells contain 2/8/2023 and 3/8/2023.
MONTH(B2)returns the number of months of the date inside cell B2, 3 in this case. Similarly,MONTH(A2)returns 2.
Likewise, YEAR(A2) AND YEAR(B2) returns the number of years in cells A2 and B2 respectively. So, the formula becomes =(8-8)*12+3-2, which finally evaluates to the value of 1.
Note: If you use a greater value in Start Date instead of the End date, Excel returns a negative value.How Does Excel Calculate Dates?
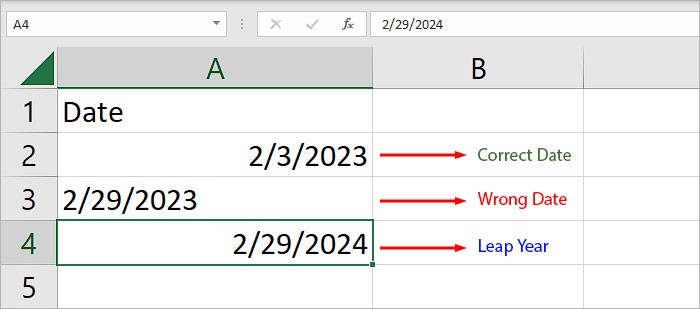
If you enter a date like 2/3/2023, Excel is smart enough to detect it as a date. So, it automatically converts it to the Date format. Also, you can notice that such values automatically align to the right.
However, if you try to enter a wrong date (date having a greater number of days than a month is supposed to have) while in the date format, Excel detects it and no longer considers it as a date. Instead, Excel treats the value as a string and aligns it to the left inside the cell.
Let’s understand with an example.

Since we entered a wrong date such as 2/29/2023, you can see Excel treating it as a string because February doesn’t have 29 days unless it’s a leap year.
But, in case the date is a leap year, Excel treats it as a normal date and not a string.
Related Questions
How Do I Calculate the Total Number of Months between Today and a Later Date?
For this specific case, you can use the =TODAY function to find the current date. Then, you can enter it into one of the preferred formulas mentioned above to get the months.