After crunching numbers and creating important charts/graphs to reflect them, you might need to present them in a PowerPoint presentation.
While you can create the visuals (charts, graphs, tables) directly on PowerPoint, it doesn’t sound convenient to repeat the process again. Plus, revisiting the slide on every spreadsheet update, could turn up the labor work.
To avoid such issues and keep up with the new changes, you can link both the Excel and PowerPoint file. Alternatively, you could embed, or copy/paste the Excel contents into PowerPoint.
Link the Excel File
Instead of converting an Excel file, a better option is to link it to PowerPoint. That’s because the PowerPoint document will update, whenever you edit or make changes in the particular Excel file.
However, the formatting changes, like the design of the chart won’t be updated. So, you need to make such changes within the Excel app itself.
To Link the Whole Worksheet/Excel File,
- Open the PowerPoint presentation file where you want to use desired Excel file.
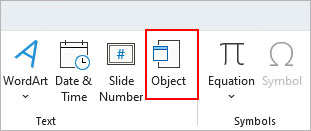
- Under the Insert tab, click Object. You can find it in the Text section.
- On the next prompt, select Create from file.
- Click Browse and open the Excel file.
- Enable the Link checkbox.
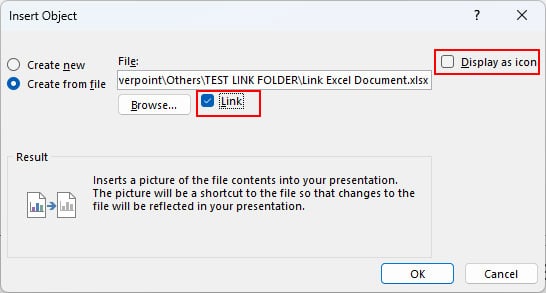
- Additionally, disable Display as icon option to insert the file and display its contents. Otherwise, you will only see a logo that redirects upon double-clicking.
- Now, double-click the Excel file icon and you should be redirected to the above-linked Excel file.
To Link Specific Part of the Excel File,
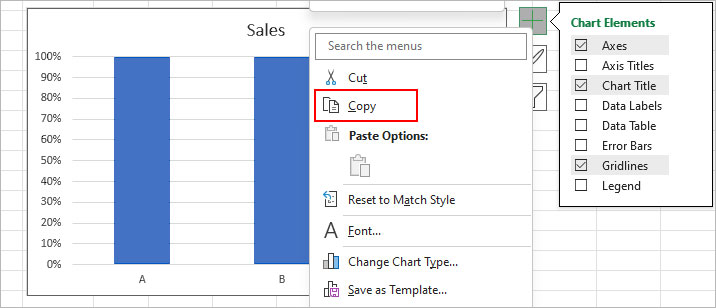
- Open the Excel worksheet, select the item you want to link (chart in this case) in the PowerPoint slide, and copy it.
- Then, open a PowerPoint slide.
- Under the Home tab, select Paste > Paste Special.
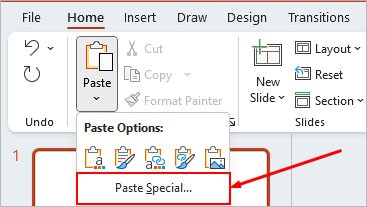
- On the next prompt, select Paste link and choose the Microsoft Excel Worksheet Object option.
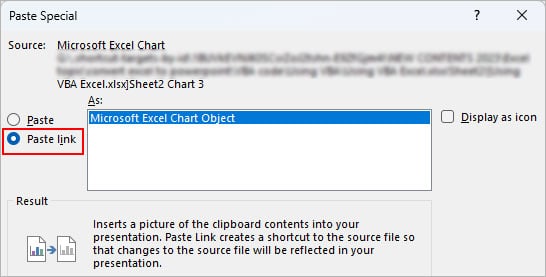
- Click OK.
Using Copy and Paste Feature
This method is particularly appropriate if you want to paste a certain part of the Excel worksheet such as a table, graph, or chart into a PowerPoint slide. However, make sure that they won’t change in the future.
Because, unlike the above method, the Excel contents you paste or embed on the PowerPoint file won’t be linked. Therefore, any changes you make to the source Excel file later won’t update the contents in the PowerPoint slide and vice-versa.
- Select all the cells containing the required data.
- Right-click and select the Copy option. Or, just press the Ctrl + C shortcut.
- Launch the PowerPoint app and open a presentation file where you want to insert the Excel contents.
- Choose the preferred slide to paste the Excel contents into the placeholder.
- Use any one of the following paste options according to your preferences.
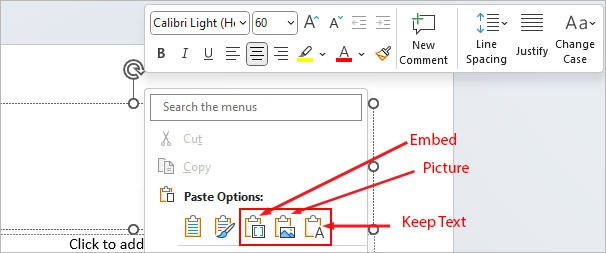
- Embed: Allows you to edit and access the copied content using the Excel app within PowerPoint. But, the original Excel file isn’t linked.
- Picture: Pastes the copied content from Excel as an image. Which means, you can only view and not edit it.
- Keep Text Only: Pastes the content without any previous formatting.
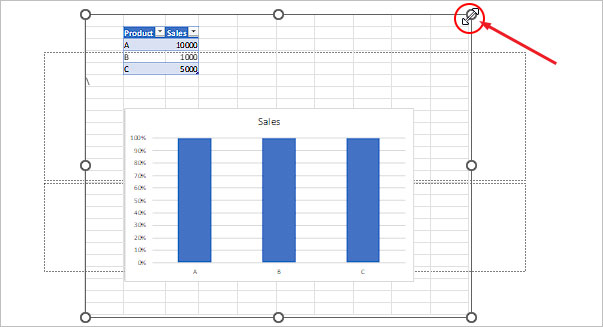
- Additionally, select the pasted item and hover over its corner. Then, use the resize handle to increase/decrease its size and fit it appropriately inside the slide.
To move the pasted item, hover over its borders. When the cursor turns to four arrow icons, hold and drag to move it.
Using VBA Code
If you have lots of Excel elements like graphs or charts, copying and pasting each one of them to create a PowerPoint presentation can be time-consuming.
To automate this process, it’s better to execute a VBA code that automatically generates a PowerPoint slide for each Excel sheet along with its contents.
For this,
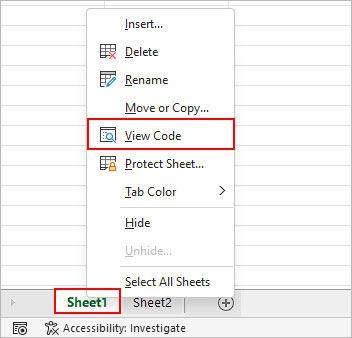
- Open an Excel file you want to convert to PowerPoint.
- Right-click on one of the worksheets and select View Code.
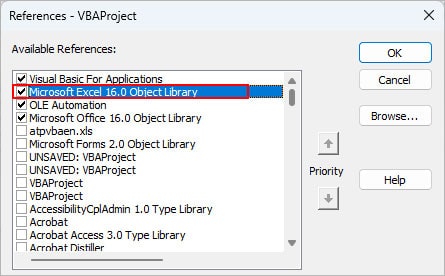
- Select Tools > References.
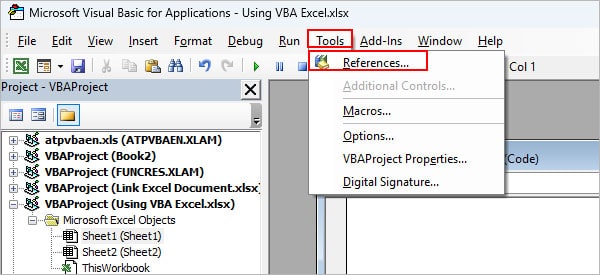
- Make sure the checkbox next to Microsoft Excel <Excel version> Object Library is enabled and click OK.
- Then, select Insert > Module from the top menu bar.
- On the new window, paste the following VBA code.
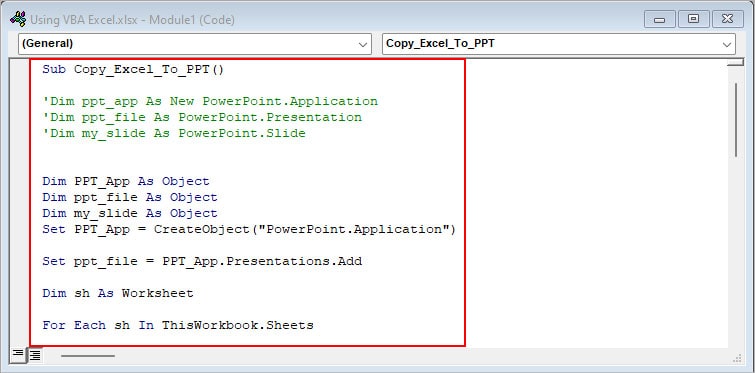
Sub Copy_Excel_To_PPT()

'Dim ppt_app As New PowerPoint.Application
'Dim ppt_file As PowerPoint.Presentation
'Dim my_slide As PowerPoint.Slide
Dim PPT_App As Object
Dim ppt_file As Object
Dim my_slide As Object

Set PPT_App = CreateObject("PowerPoint.Application")
Set ppt_file = PPT_App.Presentations.Add

Dim sh As Worksheet
For Each sh In ThisWorkbook.Sheets
    If sh.Name <> "Setting" Then
        Set my_slide = ppt_file.Slides.AddSlide(1, ppt_file.SlideMaster.CustomLayouts(6))
        my_slide.MoveTo (ppt_file.Slides.Count)
        '''''' Format Slide title
        With my_slide.Shapes.Title
            .TextFrame.TextRange.Text = sh.Name
            .TextFrame.TextRange.Font.Color = RGB(255, 255, 255)
            .Fill.BackColor.RGB = RGB(0, 128, 128)
            .TextEffect.Alignment = msoTextEffectAlignmentCentered
            .TextEffect.FontName = "Arial Rounded MT Bold"
            .Height = 50
        End With
        sh.UsedRange.CopyPicture xlScreen, xlPicture
        my_slide.Shapes.Paste
        ''''''' Resize and reposition the picture
        With my_slide.Shapes(2)
            .LockAspectRatio = msoCTrue
            .Width = ppt_file.PageSetup.SlideWidth - 30
            .Top = 0
            If .Height > ppt_file.PageSetup.SlideHeight Then
                .Height = ppt_file.PageSetup.SlideHeight - 120
            End If
            .Left = 0
            If .Width > ppt_file.PageSetup.SlideWidth Then
                .Width = ppt_file.PageSetup.SlideWidth - 30
            End If
            .Left = (ppt_file.PageSetup.SlideWidth - .Width) / 2
            .Top = 100
        End With
    End If
Next
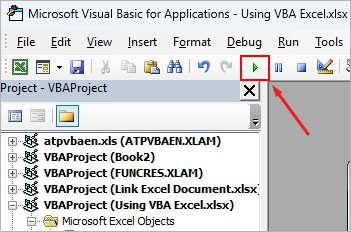
End Sub- Press F5 or click the Run icon to execute the command.
- For each worksheet, the code will generate a PowerPoint slide. Resize the contents if necessary.
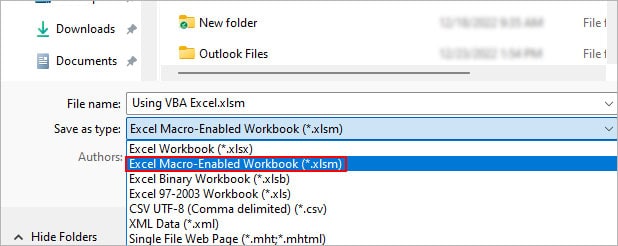
- Additionally, to save the workbook with the code, choose the Excel Macro-Enabled Workbook option next to Save as type.
Using Online Converter
Various online converters offer services to directly convert an Excel file into a PowerPoint file.
On the site, you just have to upload the Excel file. Then, the site will convert it and prompt you to download the equivalent PowerPoint file.
Such files will contain the tables, graphs, or charts of the Excel file. However, you might still need to rearrange them in slides.
Using Third-Party Tools
A PDF editor like Adobe Acrobat DC or similar has a built-in option to convert an Excel file into PowerPoint.
First, export the Excel file as PDF. Then, open the output PDF file and export it as a PPTX or Microsoft PowerPoint file.