Inside The Web
    Facebook Twitter Instagram
    Inside The Web
    • Office
      • Excel
      • Ms Word
      • OneDrive
      • Google Docs
      • Google Sheets
      • Google Drive
    • Email
      • Gmail
      • Outlook
      • Emal Etiquette
    • Office Etiquette
    • Productivity
    Inside The Web
    Home»Email»Outlook»How to Request Read Receipts in Microsoft Outlook

    How to Request Read Receipts in Microsoft Outlook

    Jabin ManandharBy Jabin ManandharJuly 27, 2023 Outlook 3 Mins Read

    With email apps like outlook, you could reach to a wide audience in matter of seconds. But sending email in bulk always comes with a risk of being ignored.

    To ensure that an important message is not lost on your recipient’s inbox, you could go an extra mile by requesting a read receipt.

    “Request a read receipt” option allows you to receive a notification once the recipient open or read the email. This is just like a blue tick mark on your message but a bit more formal with the exact date and time.

    Note: Enabling Request a read receipt does not always guarantee that your will get the read notification. Also, he/she can still choose not to send the read receipt for privacy concerns.

    Setup Request Read Receipt on Desktop

    1. Open the Outlook app.
    2. Select the Mail icon and click New Email to compose a new email message.
    3. Fill out all the necessary details in fields like To, Subject, and Body.
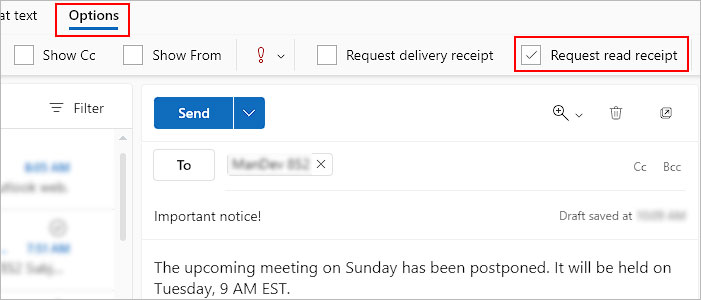
    4. Once done, select the Options tab and enable the Request a Read Receipt checkbox.
      Request-Read-receipt-Outlook-desktop-app
    5. Click Send.
    Note: If you are using Outlook without an Exchange or Microsoft 365 work/school account, you might not find the above feature.

    Setup Request Read Receipt on Browser

    1. Open a browser and log in to your Outlook account.
    2. Click New mail under the Home tab to compose a new message.
    3. Fill in the fields with the necessary details.
    4. Select the Options tab and enable the Request read receipt checkbox.
      Request-read-receipt-Outlook-web-version
    5. Once done, click Send.

    How to Request Read Receipts for All Outgoing Mails?

    If you constantly need confirmation of the recipient opening the message, you can enable an option to request read receipts for every outgoing message.

    On the other hand, if you are a recipient, you can enable an option to automatically send read receipts for every message that requests it. Or, you can choose to reject each of such requests.

    1. Open the Outlook app.
    2. Click File on the top menu bar.
    3. Then, select Options in the bottom left corner of the window.
    4. Now, click the Mail tab in the sidebar.
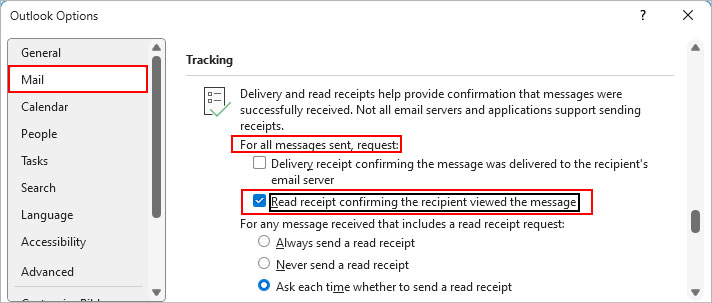
    5. On the right pane, scroll down to the Tracking section. 
    6. Then, enable the checkbox next to the Read receipt confirming the recipient viewed the message option.
      request-Read-receipt-for-every-message-you-send
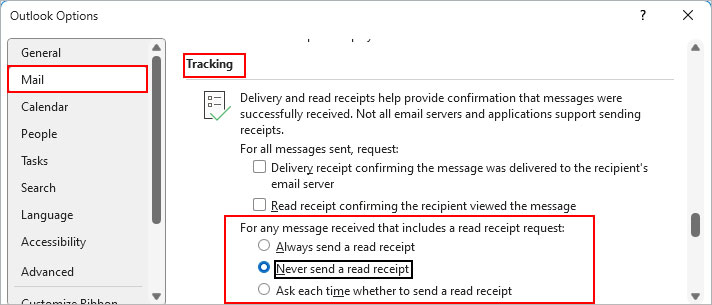
    7. If you are the recipient, select the preferred option to automatically send or reject the read receipt for every incoming message that requests it.
      respond-to-read-receipt-request-automatically-on-Outlook-Desktop
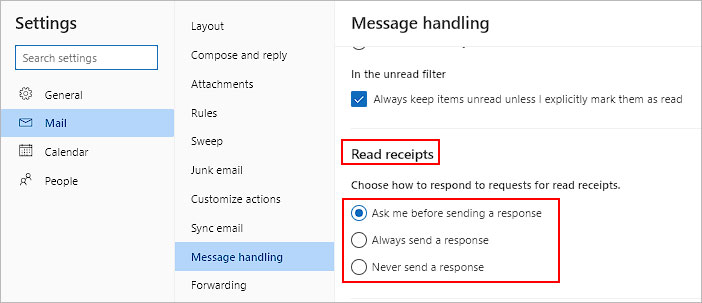
    8. To automatically send or reject read receipts on the Outlook web version, go to Mail > Message handling and select the preferred option under the Read receipts section.
      respond-to-read-receipt-request-Outlook-web-version
    9. Click OK.
    10. Restart Outlook.

    Related Questions

    Will Outlook Notify Me When Someone Rejects to Send the Read Receipt?

    In short, no. If the other person rejects or just ignores the request to send the read receipt, then you won’t get any notification about it.

    How to Receive a Read Receipt without Letting the Recipient Know About It?

    You can only receive the read receipt once the recipient chooses to send it. So, there’s no possible way that they won’t know about it.

    However, if they have enabled the Outlook option to automatically include the read receipt when requested, then there’s a chance that they might miss it.

    Jabin Manandhar

      As a tech content writer, Jabin covers Excel-related articles at InsideTheWeb. His articles mainly involve helping new users to quickly familiarize themselves with the Excel interface and explaining various essential features. While he got introduced to Excel in his early school days, he developed a keen interest in it after working on a college project. He was impressed at how quickly one could accomplish several tasks with built-in functions like the filter function and user-friendly tools like the power query. Keeping beginner audiences in mind, he loves to explain even the most fundamental Excel concepts in detail and break down complex topics with a step-by-step approach. As an avid Excel user, he believes every task can be done a lot quicker if you know the right tools and techniques. When he’s not behind a keyboard, he loves to listen to interesting audiobooks and podcasts.

      Related Posts

      Outlook By Jabin Manandhar

      How to Ignore Email Conversations in Outlook

      Outlook By Jabin Manandhar

      How to Hide Calendar Details in Outlook

      Outlook By Jabin Manandhar

      How to Insert Emoji and Smiley in Outlook

      Add A Comment
      Table of ContentsToggle Table of ContentToggle
      • Setup Request Read Receipt on Desktop
      • Setup Request Read Receipt on Browser
      • How to Request Read Receipts for All Outgoing Mails?
      • Related Questions
        • Will Outlook Notify Me When Someone Rejects to Send the Read Receipt?
        • How to Receive a Read Receipt without Letting the Recipient Know About It?
      • Home
      • About Us
      • Privacy Policy
      © 2025 Inside The Web

      Type above and press Enter to search. Press Esc to cancel.