Taking screenshots of your Excel sheets can be the best way to share a portion of your current work with others. This way, you wouldn’t have to share an entire sheet or workbook. Additionally, screenshots can increase the readability and comprehensibility of the information you’re trying to present.
I personally, capture screens while adding comments on others’ sheets to pinpoint the required changes. My go-to method for capturing Excel screens is the Windows Snipping tool. Using this tool, I can snip the whole screen or just the partial area. The best part is there are Hotkeys to do so which can come in handy for taking screenshots in other applications too.
Apart from the Snipping tool, there are three other methods to upload or capture screens in Excel. You could opt for Excel’s default Screenshot tool, Copy as Picture command, or third-party applications depending on your need.
Using Excel’s Screenshot Menu
Microsoft Office Applications has an in-built Screenshot tool. In Excel, you can find this tool in the Insert Tab. So, if you need to upload any snapshots in your spreadsheet, you could opt for this method.
One of the best functionality of this feature is that once you take a screenshot of the window, Excel will directly add them to your sheet. You can choose to take a screenshot of an entire window or just a selected area.
- On your Excel sheet, head to the Insert Tab.

- From the Illustrations section, click on the Screenshot. Then, do one of the following.

- To take a screenshot of an entire window, simply click on one of the Images under Available Windows. When you do this, Excel will immediately upload the snapshot in the sheet.
- To capture only certain areas, pick the Screen Clipping Menu. Using the snipping tool, select the desired Area of the Window and release. You’ll have the screenshot in the sheet.
- To edit the Screenshot image, select the picture and head to Picture Format Tab. Customize the Picture Size, Style, Effects, Border, Layout, Color, etc as you wish.

Using Copy as Picture Command
Excel’s Screenshot tool is best to take and upload the screenshot of other open workbooks and windows. But, you won’t be able to capture the screen of your current workbook. In such instances, you could use the Copy as Picture Command.
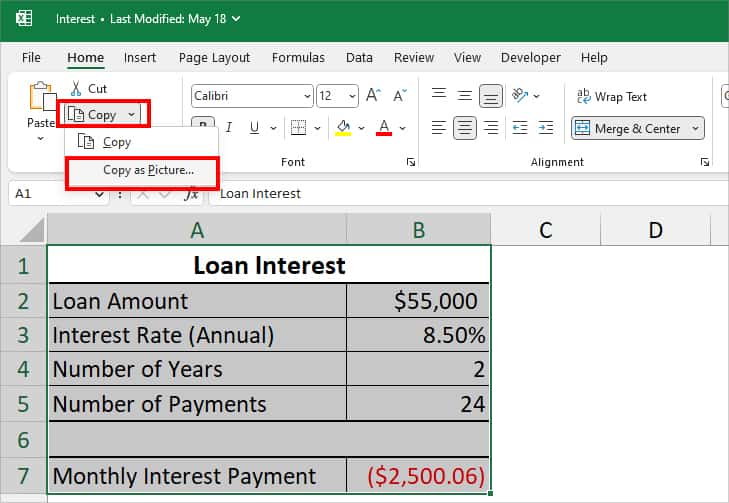
- Select an area on your Excel sheet.
- Head to Home Tab.
- Then, from the Clipboard section, click on Copy > Copy as Picture.

- On Copy Picture window, hit OK.

- Go to the desired Sheet and enter Ctrl + V to paste the picture. You can edit the image from Picture Format tab.

Using Snipping Tool
While Copy as a Picture is handy to quickly capture your current screen, it isn’t the best option if you want screenshot features. So, you could use your PC’s default pre-installed Snipping tool as an alternative. Let’s check out the steps for both Mac and Windows below.
On Windows
I mostly use the keyboard shortcuts mentioned in the box to quickly capture Excel screens on my Windows.
Entire Screen: Windows + PrtScn
Partial Screenshot: Windows + Shift + S
For the whole screen, entering the hotkeys will directly capture the screen and save it on your PC. However, for the partial screen, you need to left-click on your mouse and select the area to snip them.
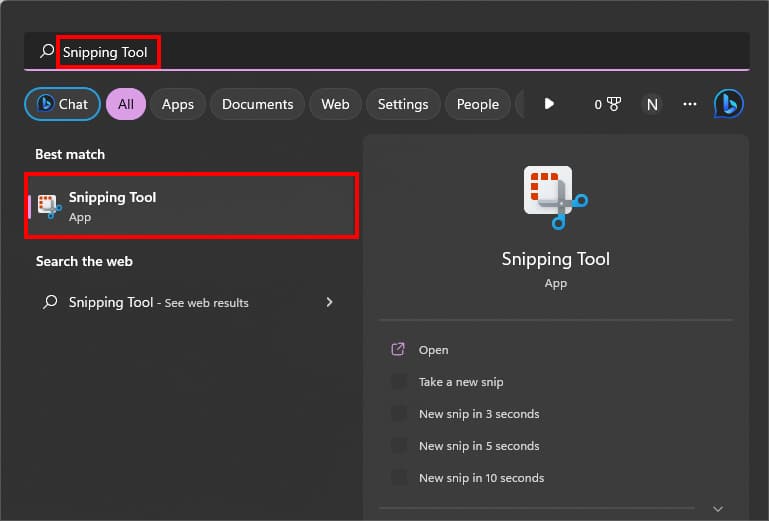
Alternatively, if you do not like shortcuts, you can launch the Snipping Tool app and take a screenshot. This is also useful for users who want to change the screenshot settings.
- Enter the Windows key to bring up the Start menu.
- Type in Snipping Tool in the Search bar and click on the App to open it.

- Now, click on the Screenshot Mode icon and pick an option.

- Rectangle mode: Take a screenshot of the selected area in a rectangular shape.
- Window mode: Use this to capture a single Window or Dialog box.
- Full-screen mode: Snip the whole screen.
- Free-form mode: Screenshot of a selected area in a free-form.
- Once you set the Screenshot mode, click on +New to capture the area. Using the Snipping tool, select an Area to take a screenshot.

- The captured screenshot will appear in the clipboard of the Snipping Tool. Edit the picture if needed.

- Finally, to save press down Ctrl + S keys and choose a location on the Save As window.
- Hit Save.

On Mac
If you use Mac, there’s also a keyboard shortcut to capture your screen. Enter the hotkeys mentioned in the box to take a screenshot.
Entire Screen: Shift + Command + 3
Partial Screen: Shift + Command + 4
Window or Menu: Shift + Command + 4 + Space bar
Once you enter the hotkeys, select the area of the screen using the Snipping Tool to capture them. You can access the captured screenshots from your desktop.
Alternatively, just like Windows, you can also launch the Snipping tool and capture screen.
- Press down Shift + Command + 5 buttons together.
- Pick one of the Tools to capture the Screen in that mode
- Screenshot the Whole screen
- Capture Window
- Capture only a partial screen
- Record the whole screen
- Record only certain areas of the screen
- Click Capture.
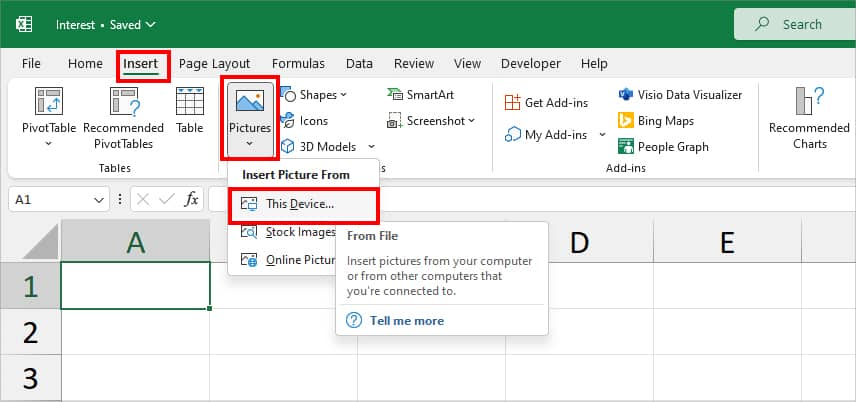
To upload the Screenshots taken from the Snipping tool into your current workbook, head to the Insert tab on your Excel. Click on Pictures > This Device from the Illustrations group. Once you locate the screenshot, select it and hit Insert.

Using a Third-party Snipping Tool
If you’d like to access more features for your screenshots, you could check out third-party applications. Some of the reliable and popular snipping applications are LightShot, ShareX, Greenshot, CleanShot X, etc. These tools allow you to draw text boxes, arrows, lines, etc.