I have expressed my profound love for Excel’s autofill feature many times. Excel’s autofill feature has insane capabilities when it comes to automation. You can copy the same data as many times as you wish, or even generate a pattern. All of which, make data entry that much simpler.
With everything it brings to the plater, it can be a bummer when Autofill stops working, or fills in the wrong data. Don’t worry, this is a common issue even some of the experts unfortunately face. While the culprit is most often with the data you’ve selected for the fill, other triggers also fail the autofill utility.
Excel Autofill Not Working
Generally, there are seven reasons why Autofill returns the wrong output in Excel. You may go through the list of triggers to see which problem feels more relevant to you:
- Insufficient Selection
- Autofill and AutoComplete disabled
- Filter is Enabled
- Sticky Key Enabled
- The Pattern does not Exist
- Corrupt Microsoft 365
- Outdated Microsoft 365
How to Fix Excel Autofill Not Working?
It is typical for autofill to temporarily fail due to external factors. For each issue we listed in the section above, we have eight fixes; including a bonus fix!
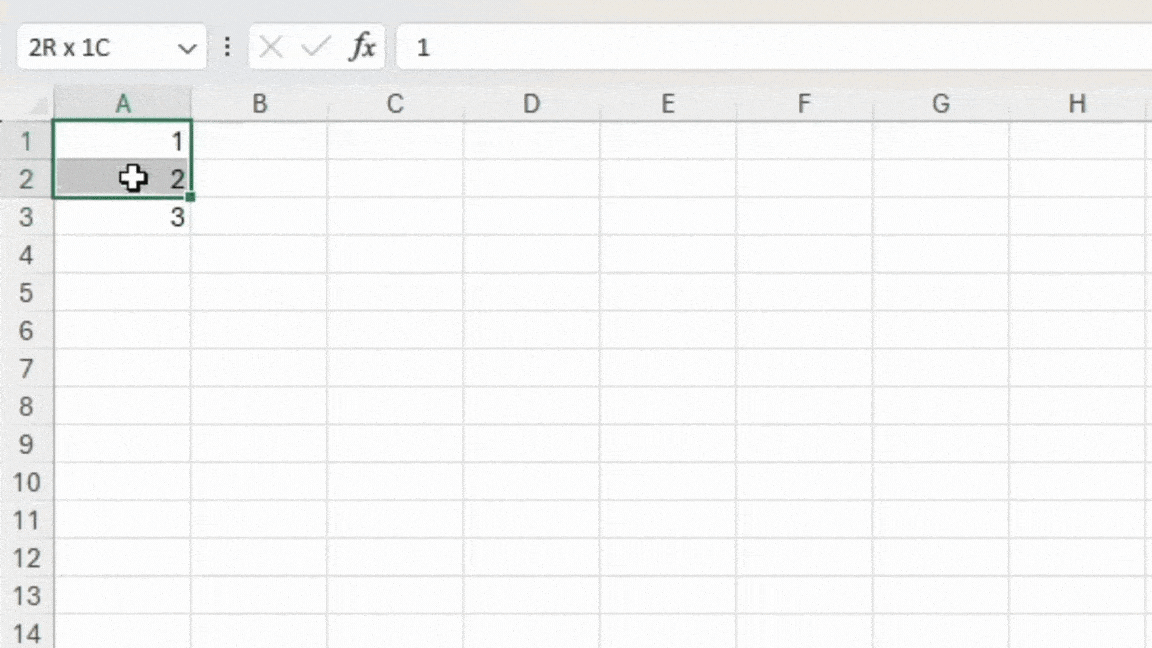
Make Proper Selection
If Autofill duplicated your active cell instead of creating a pattern, you should check your selection.
If you wish to generate a pattern, you must select more than one cell. This will allow Excel to identify the pattern to replicate it on the selected cells. Similarly, if you wish to replicate the active cell, make sure only that cell is selected when you drag the fill handle.
Enable the Autofill and Autocomplete Feature
The Autofill and Autocomplete features are enabled by default on Excel. If you’re into tweaking the Excel interface to personalize it, you may have accidentally disabled either, or both of these settings. Fret not, you can enable them as easily as you might’ve disabled them from Excel Options.
- Head to File > Options.
- From the window, go to the Advanced tab.
- Under Editing options, check if Enable fill handle and cell drag-and-drop and Enable AutoComplete for cell values > Automatically Flash Fill are enabled.
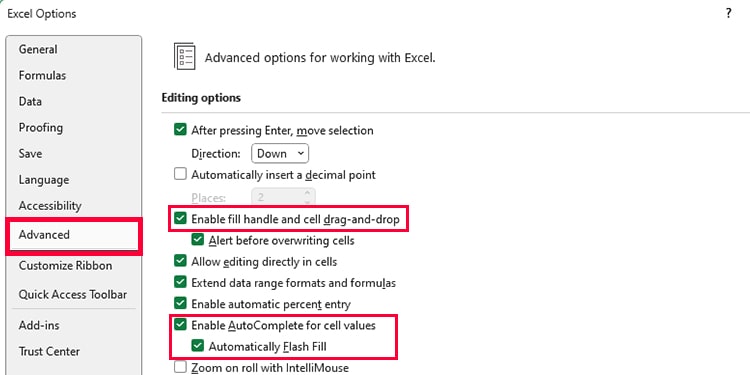
- If not, enable them and click OK.
Disable Filter
Data analysts will agree when I say adding filters is so important in your spreadsheet. However, it comes with a downside; this makes autofill fail.
When you filter your data, you’re essentially rearranging the order of your data. This breaks the pattern Excel uses to generate the autofill values. Here’s a tip, disable the filter, use autofill then, re-add the filter. This will save you from the hassle of manually entering data.
If you’re a fan of shortcuts, you can use Excel’s shortcut for adding and disabling filters, or use the ribbon to disable the active filter.
Shortcut
Ctrl+Shift+LExcel Ribbon
- Go to the Data tab.
- From the Sort & Filter section, click on the Filter option.

Enable Automatic Calculation
You may have enabled manual calculation in your spreadsheet to save Excel’s resources. However, when you disable automatic calculation, your formulas will not update thus, making it seem like autofill isn’t working.
Try enabling automatic calculation in your Excel program and see if it solves your issue:
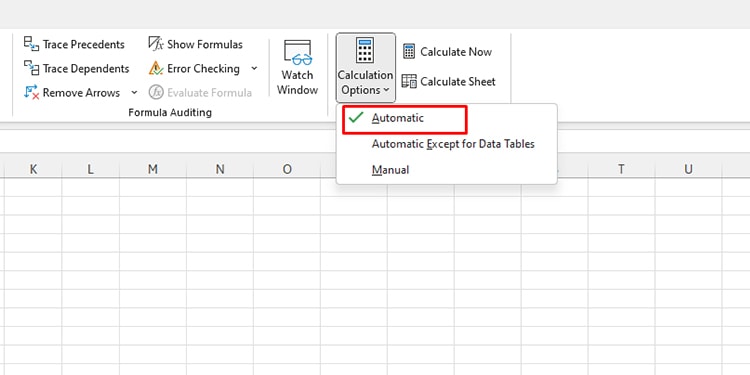
- Go to the Formulas tab.
- In the Calculation sections, select Calculation Options.
- Choose Automatic.
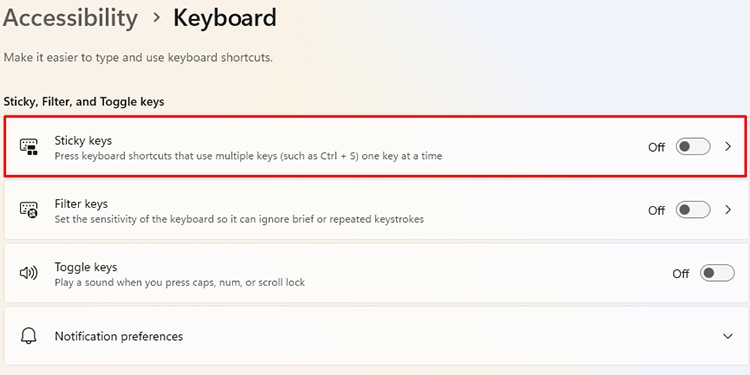
Disable Sticky Keys
If you hold the CTRL key while dragging the fill handle, Excel will duplicate the selected cells from the grid instead of auto-filling the pattern. If you’re not holding the CTRL key, you could’ve enabled sticky keys.
If you have enabled sticky keys, even hitting the CTRL once before dragging the fill handle will replicate the selected cells. If you don’t need sticky keys as much, you can disable it from Windows settings.
- Go to Settings (Windows key + I).
- Head to Accessibility.
- Under Interaction, click Keyboard.
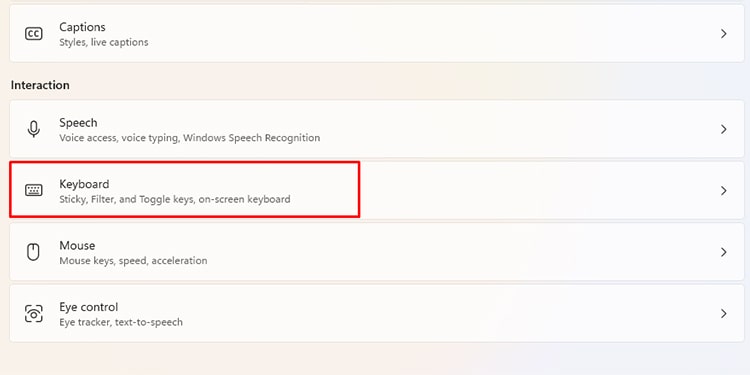
- Toggle off the option for Sticky Keys.
Use Custom AutoFill
The pattern you’re looking to generate may not exist. This may make it seem as if autofill is not working in Excel.
Take, for instance, if you want to generate a pattern like abc-123, efg-456…, you may expect to see the following entries as hij-789, klm-1011… However, this is not a definite pattern and Excel may return a different result.
For patterns as such, you can create a custom autofill list in Excel. In this list, you can manually enter the list of items you wish to use on your spreadsheet.
- Head to File > Options.
- Go to Advanced.
- Under General, select Edit Custom Lists.
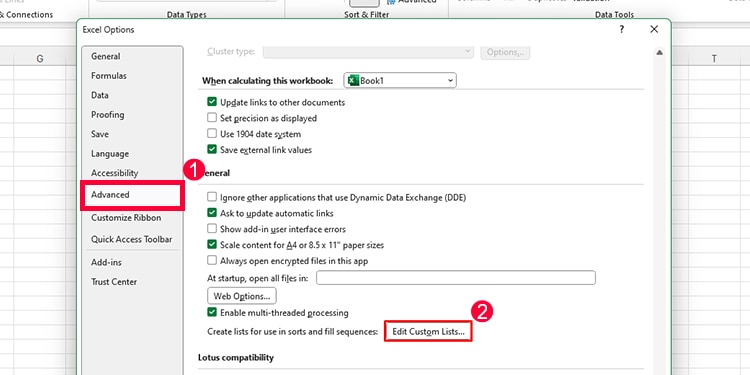
- Make your entries under List entries and click Add.
- Click OK.
Right-Click While Dragging the Handle
This was the bonus fix I was talking about. While dragging the fill handle using the left button on your mouse generally does the trick, you can use the right button for more options.
This method should cover all types of fill that are possible for Excel to generate on your data. Select the cell/range you wish to use as a reference. Place your cursor on the left corner of the last cell, right-click then drag the fill handle. Once you drop the handle, you will be presented with Fill options that include:
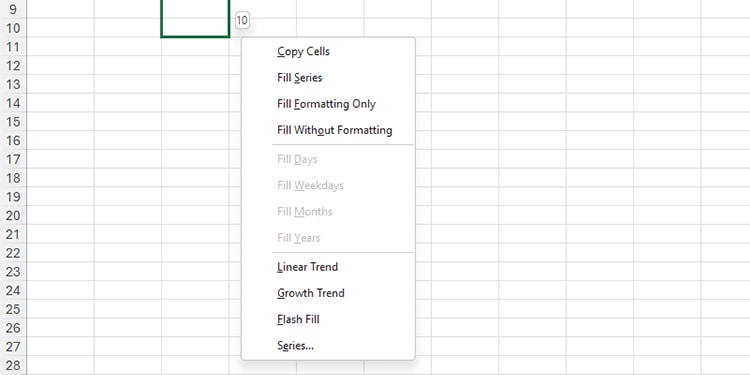
For Numbers
- Copy Cells
- Fill Series
- Fill Formatting Only
- Fill Without Formatting
For Dates
- Fill Days
- Fill Weekdays
- Fill Months
- Fill Years
For Trends
- Linear Trend
- Growth Trend
- Flash Fill
Update Microsoft 365
You should keep your Microsoft 365 account updated at all times. You may miss out on many utilities, including the existing ones if you keep any software outdated for a long time. As Excel is part of the Microsoft 365 suite, you will have to update the application to update Excel and other programs in the suite.
- Launch Excel and head to the File tab.
- From the sidebar, click Account.

- Click on Update Options > Update Now.
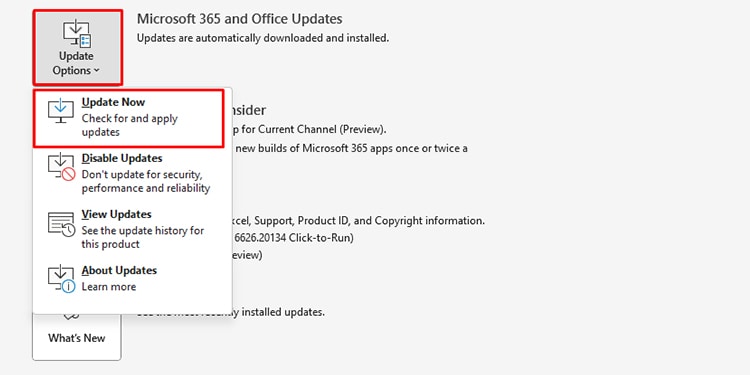
- Excel will check for updates and present them to you, if any.
- Restart Excel.
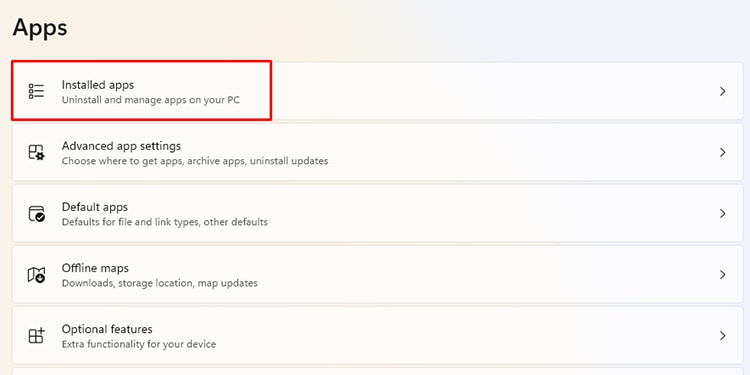
Repair Microsoft 365
You could be facing issues with Excel due to corrupt or missing files. As we mentioned, Excel is a part of the Microsoft 365 suite. When there is an issue with the program files, Excel cannot execute certain commands. You can perform an online repair that will replace the problematic files with a set of new ones.
- Go to Settings (Windows key + I).
- Head to Apps > Installed Apps.
- Scroll down to Microsoft 365 and click on the three-dot menu.
- Select Modify.

- Click Yes on the User Account Control.
- Select Online Repair > Repair.
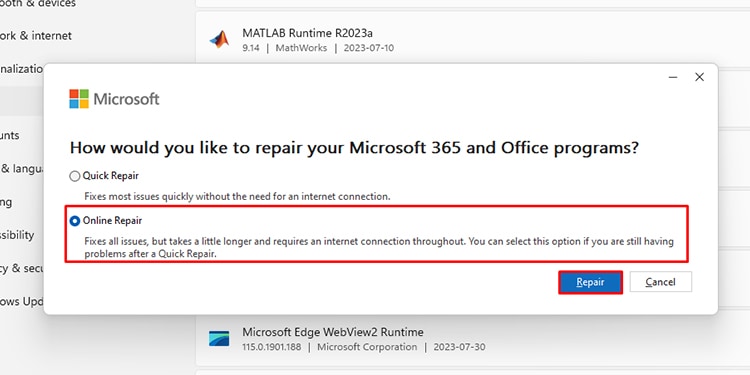
- Choose Repair.